By default, whenever an individual creates a meeting inside Outlook an online link to Teams is automatically generated. For users who use Zoom for their meetings, this default and automatic feature can cause some confusion. Thankfully, there is a way to disable this feature in both the Online and Desktop versions of Outlook.
Online Version of Outlook
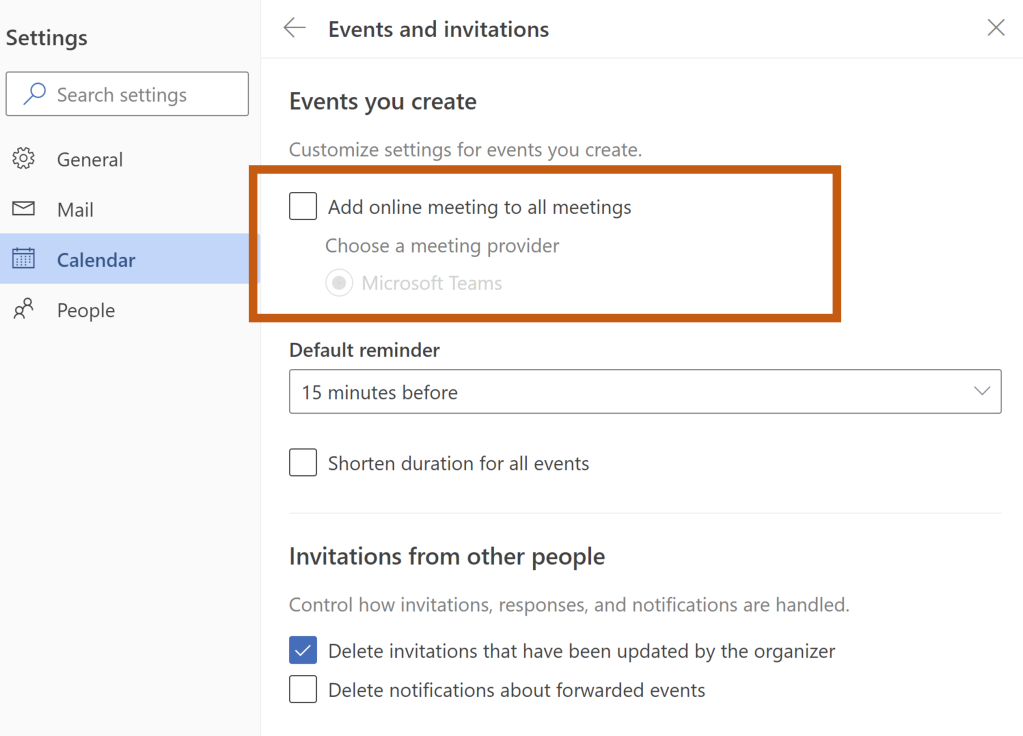
For the online version of Outlook, use the GEAR button at the top right to activate the settings menu. Then click on Calendar / Events and Invitations to show this menu. Uncheck “Add online meeting to all meetings.”
To turn off the MS Teams default, UNCHECK the box next to Add online meeting to all meetings
Desktop Version of Outlook
For those using the Desktop version of Outlook, watch the first 90 seconds of this video to learn how to turn off the feature in Outlook Desktop.
This is my second Power Automate project for my coworkers in Faculty Affairs. The purpose for this flow was to extract faculty members from the database 18 months after their initial appointment, with some additional filters for their rank and track.
The purpose for the extraction is to alert new faculty that they should think about working on their promotion packages which are due at the second year anniversary. We want to give them a 6-month reminder.
We wanted to exclude faculty ranks of Professor or Emeritus because there are no more promotions for them in this realm.
We also wanted to exclude the track of Tenured, which in our world means that they no longer can/want to be promoted and will stay in their current rank.
The process for creating the flow is very similar to that outlined in the Extracting Data from Excel Using Power Automate sequence, which will contain more detailed instructions in many cases. Please refer back to that article for the different sections.
Complete Power Automate Sequence
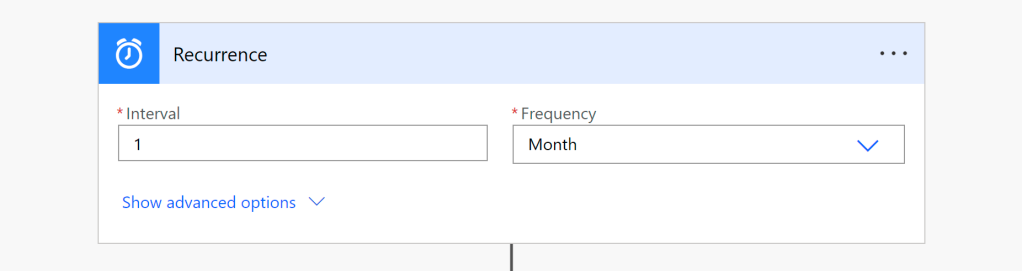
Step 1: Setup trigger or recurrence
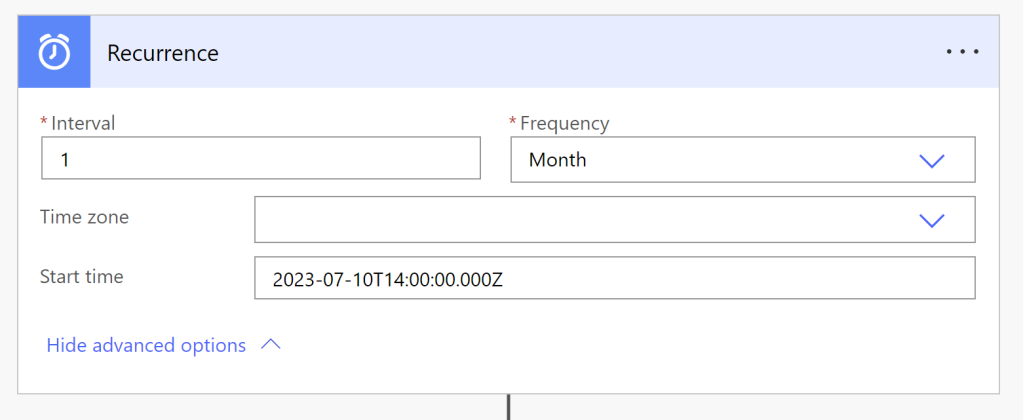
We start with adding a recurrence. In our case we want to run this monthly, and we set July 10 to be the start date.
Recurrence: run this flow every month. Interval: 1; Frequency: month You can also add time zone and start time (in ISO 8601 format) e.g. 2023-07-10T14:00:00.000Z
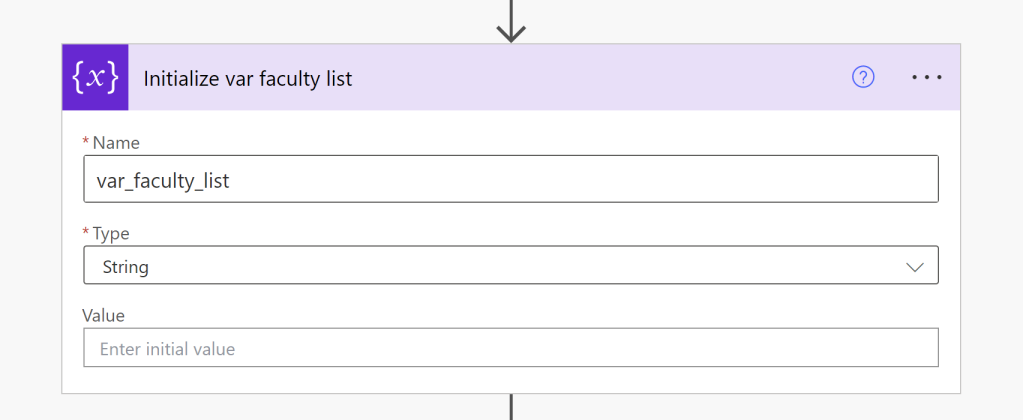
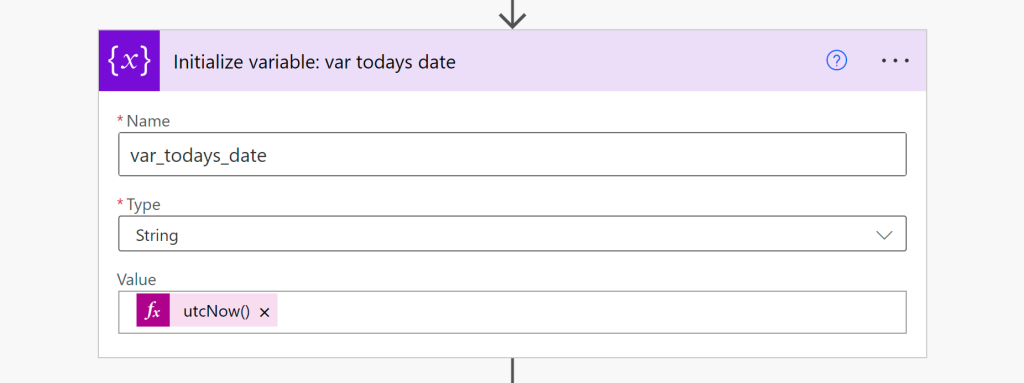
Step 2: Initialize all the variables you will need
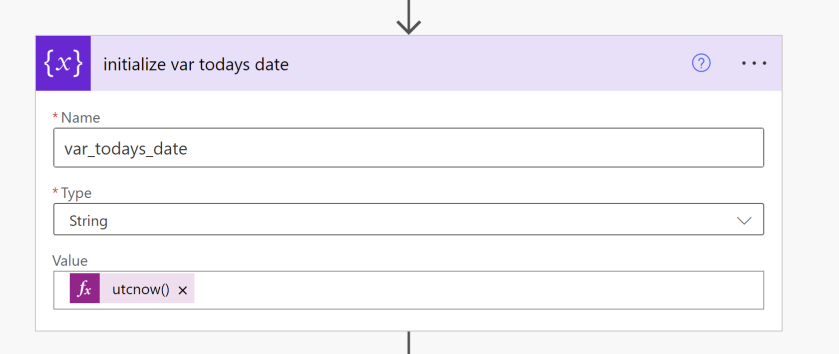
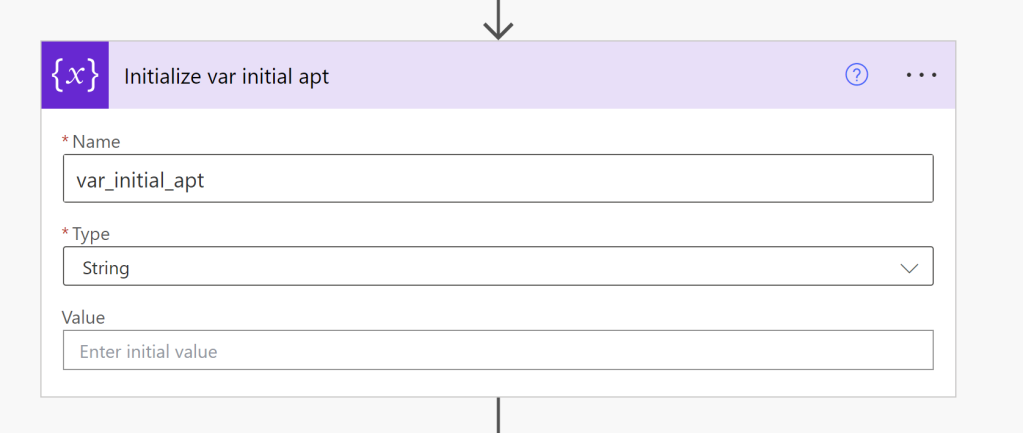
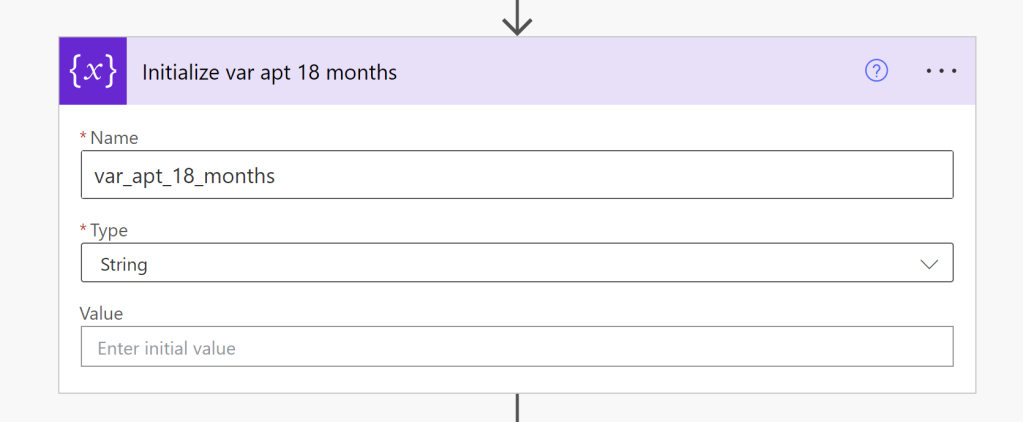
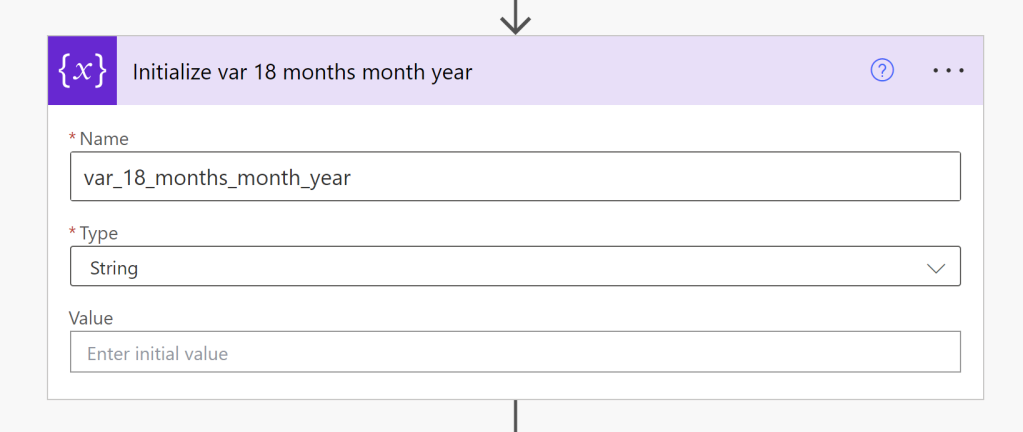
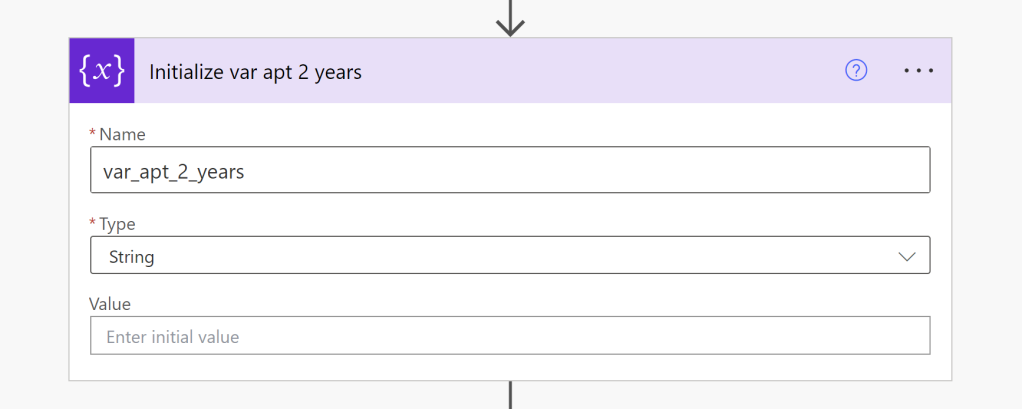
Initializing (or creating) variables is the first step. A variable is nothing more than an element of data. You don’t necessarily need to put them all in the beginning of the flow, but I like to do so to help me stay organized. You use the Initialize Variable command to create the variables. In this flow, we create mostly date manipulation variables for today’s date, the 18 month date, the 2 year date, etc.
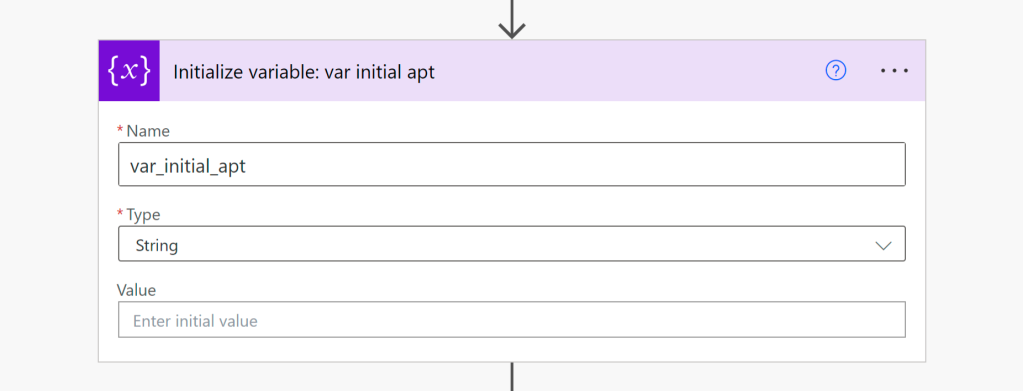
Most of the variables will remain blank upon creation as we will be using the Set Variable command later to assign data to these variables.
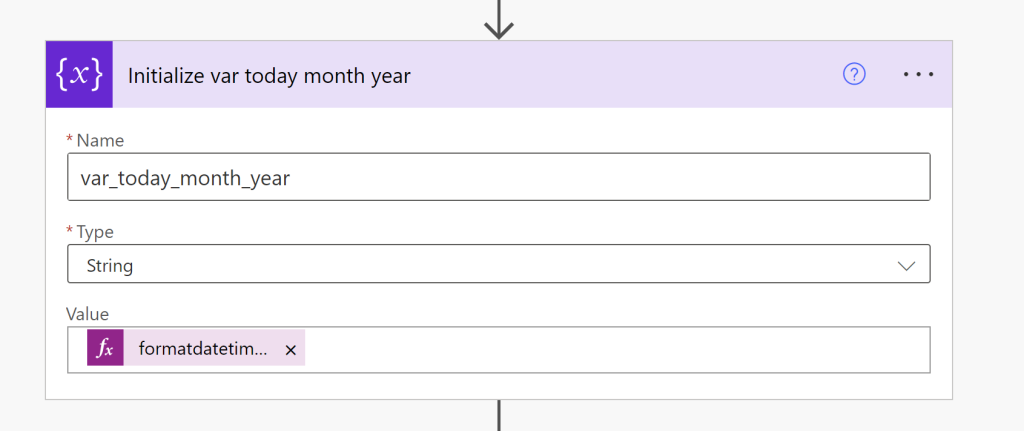
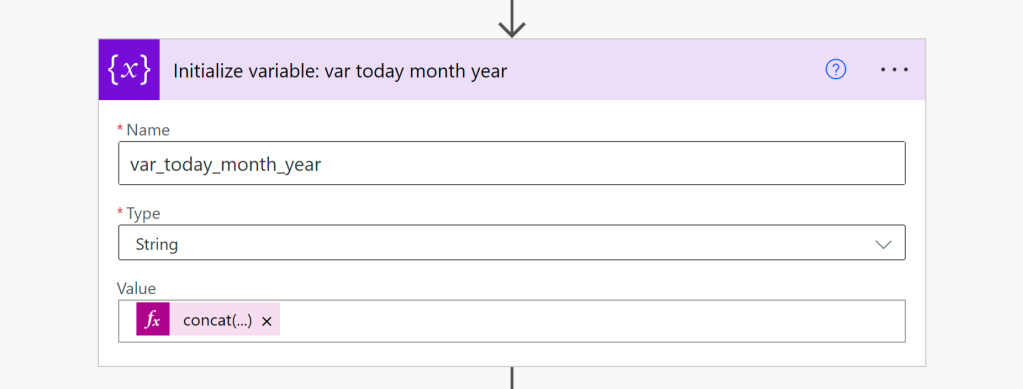
In the var_today_month_year variable we now take today’s date and only extract month and year so we can compare it against the month and year in the 18-month variable we will create later on.
The var_18_months_month_year variable will take the above variable and only provide the month and year so we can compare it against the month and year for today’s date.
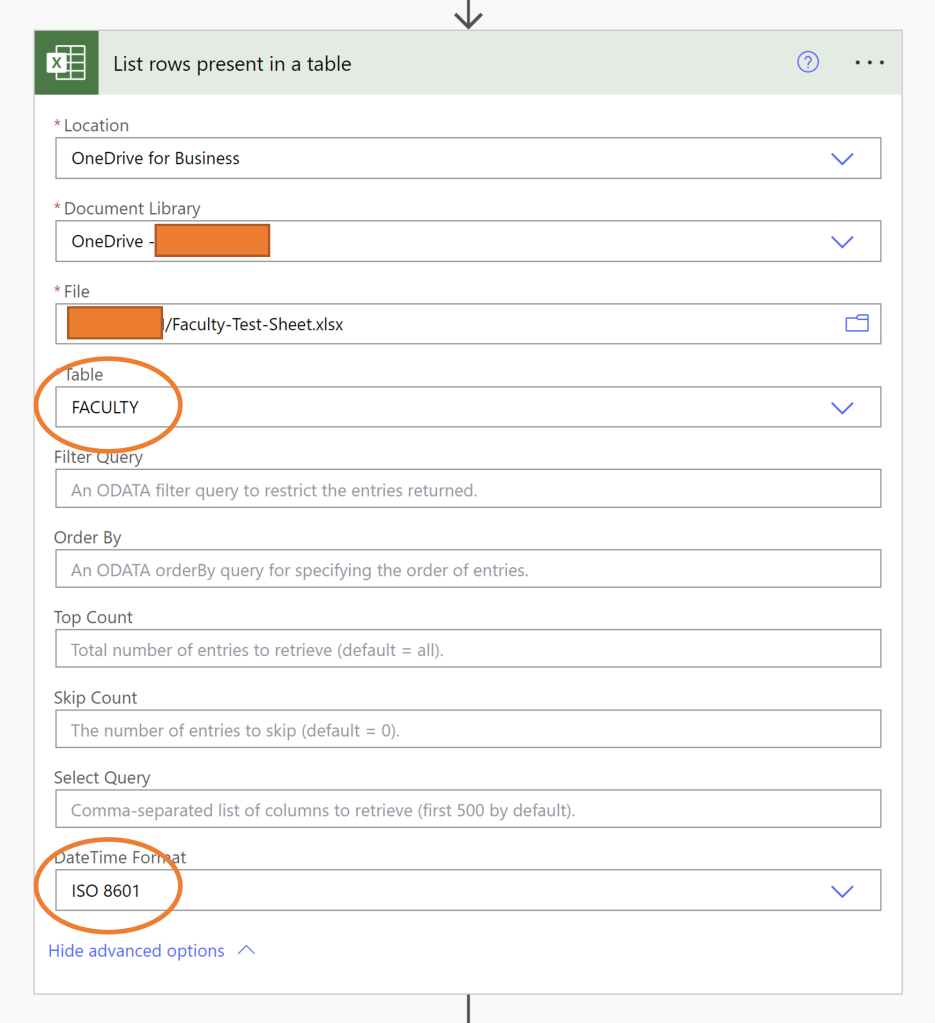
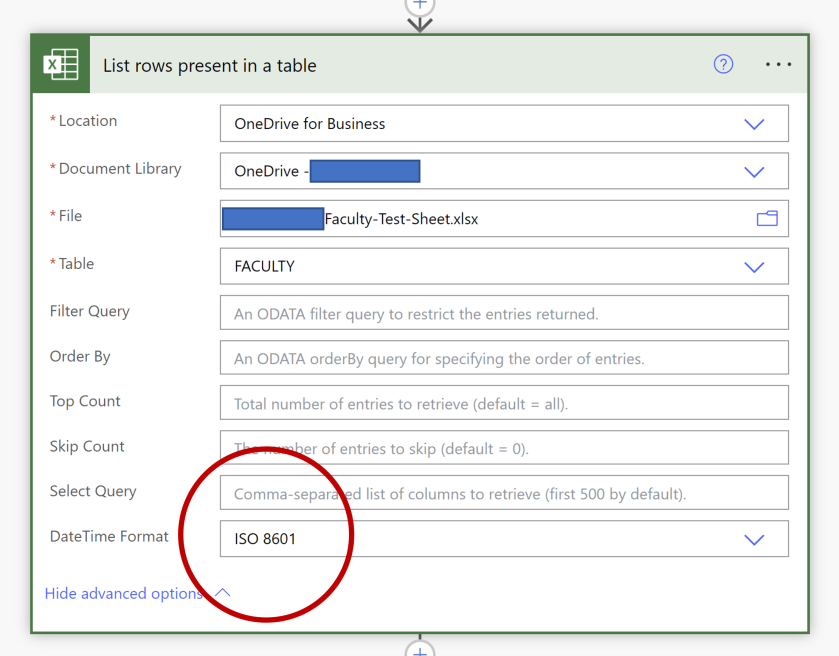
List Rows present in a table. Choose the location, library, and file with which you want to work. Choose the name of the table. Under Advanced options, set DateTime format to ISO 8601
The most important piece beyond locating the spreadsheet itself, is making sure that under the Advanced Options, that you set the date format to ISO 8601. You won’t be able to perform calculations without this action.
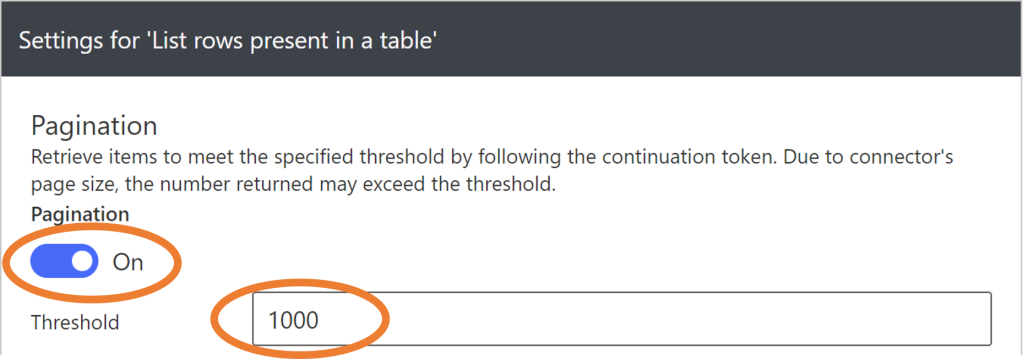
Overriding 256 row limit in Excel
By default, Microsoft limits the number of rows that it will process per session. The default limit is 256. If your file contains more than 256 rows, this won’t be very helpful.
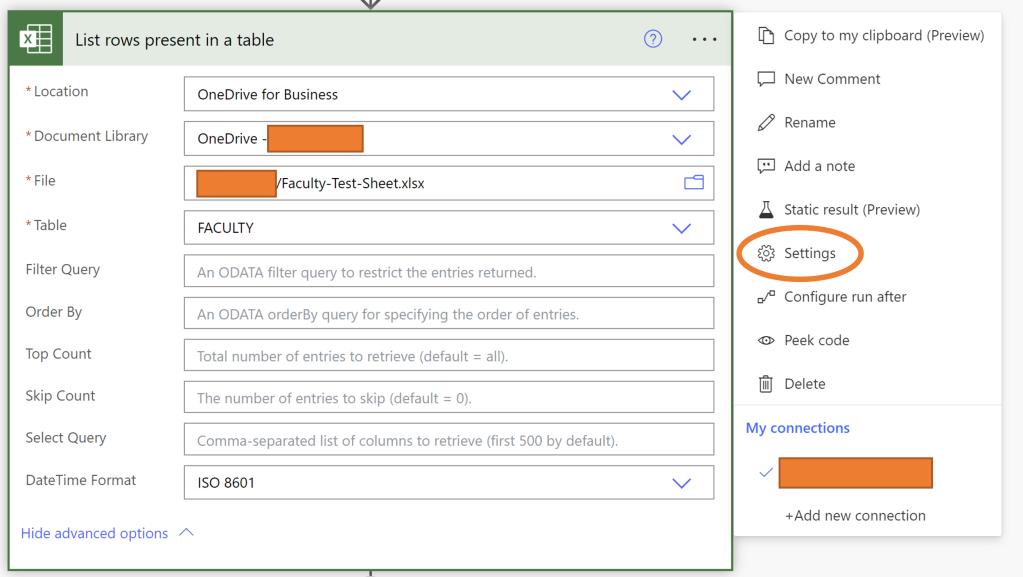
To override this limitation, click on the … dots in the List Rows present in a table action and access Settings.
Use the … dots to access the Settings menuEnable Pagination and set your Threshold to the number of rows you want to check.
Enable Pagination and then set the number of records you want to process in a single call in the Threshold value. The example above shows 1000 as our database contains 850 rows currently.
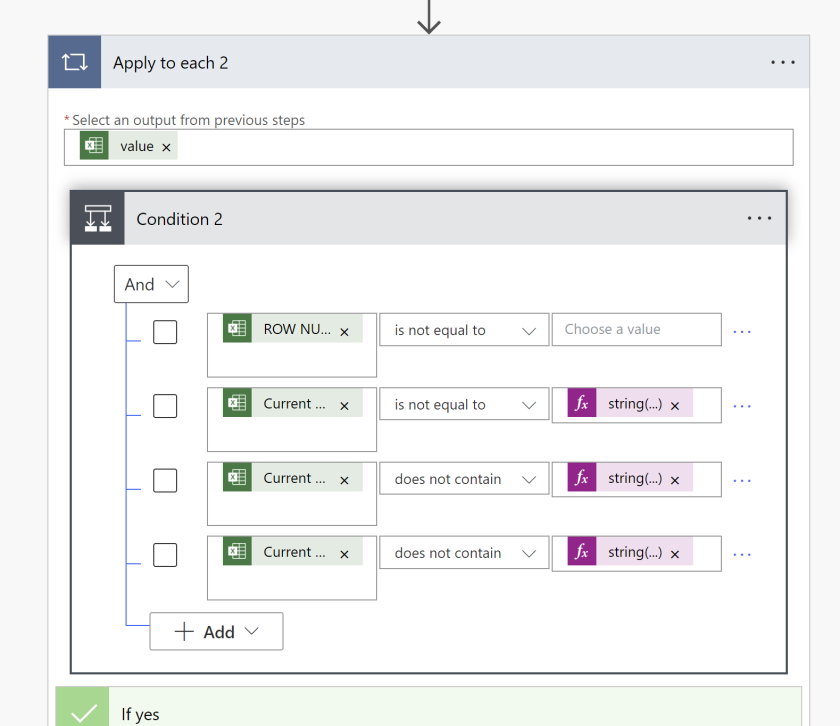
Step 4: Add the first round of filters
Use the Condition feature to create the first round of filters.
Add Condition Action Select an output from previous steps: Use Value from the spreadsheet. Use the settings below to set four filters.
The filters I used here are as follows:
ROW NUMBER is not equal to (leave value blank)
Current Rank is not equal to string(‘Professor’)
Current Rank does not contain string(‘Emeritus’)
Current Track does not contain string(‘Tenured’)
Which basically ensures that the row is not blank and
exclude anyone who already holds the Professor rank
exclude anyone who holds Emeritus status
exclude anyone who is already fully tenured
Step 5: Set and manipulate variables
From here you create actions for those that meet the exclusion criteria above under the YES column. If there was anything you wanted to do with anyone who do not meet the exclusion criteria, you would enter actions in the NO column. In this flow, we won’t be using the NO column for this condition.
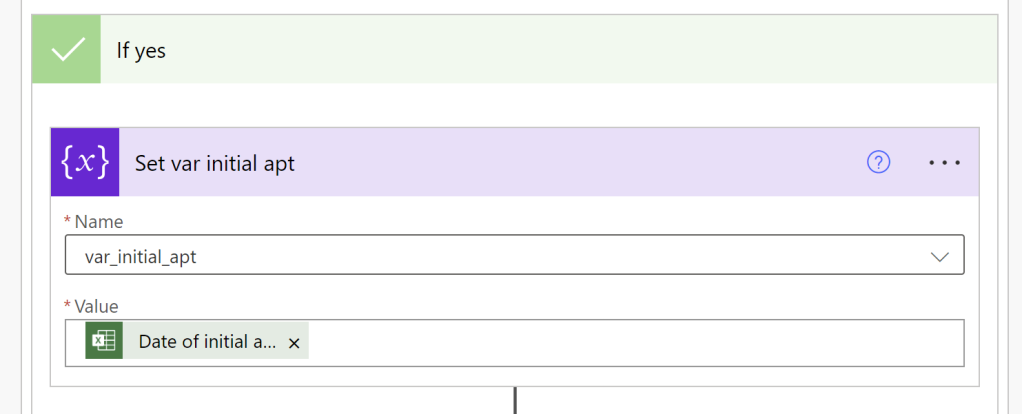
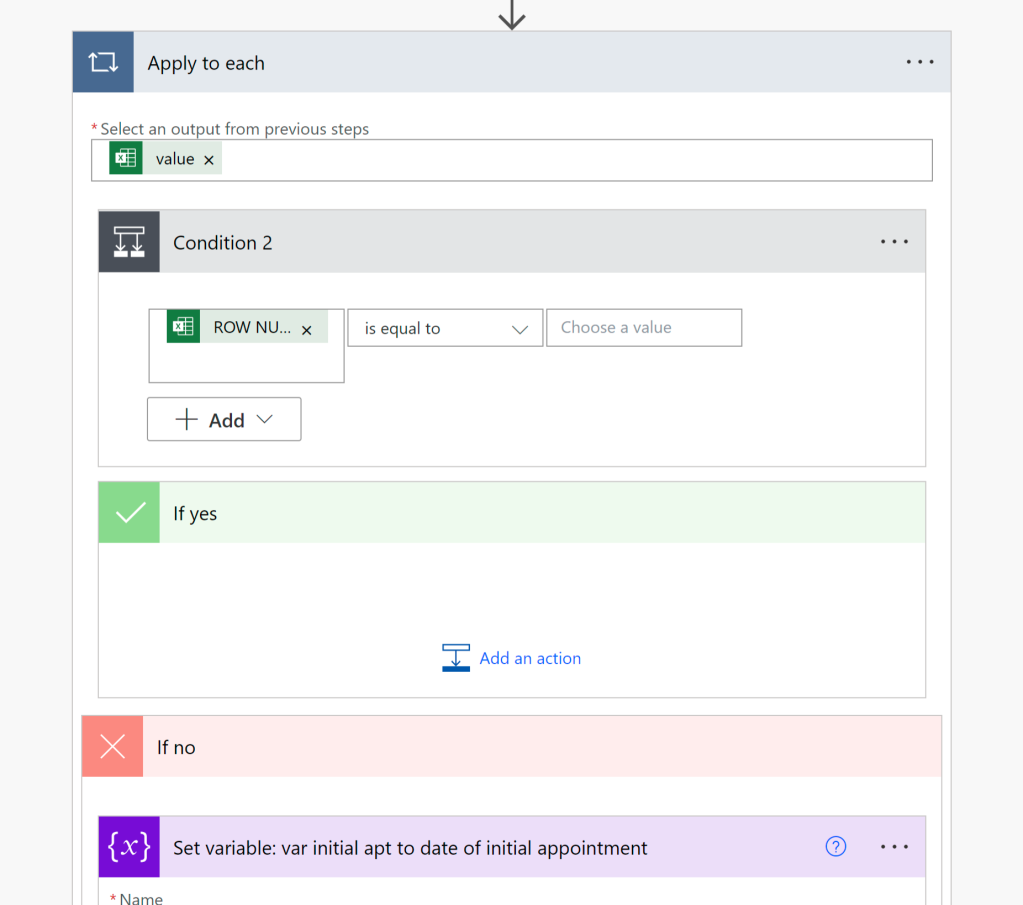
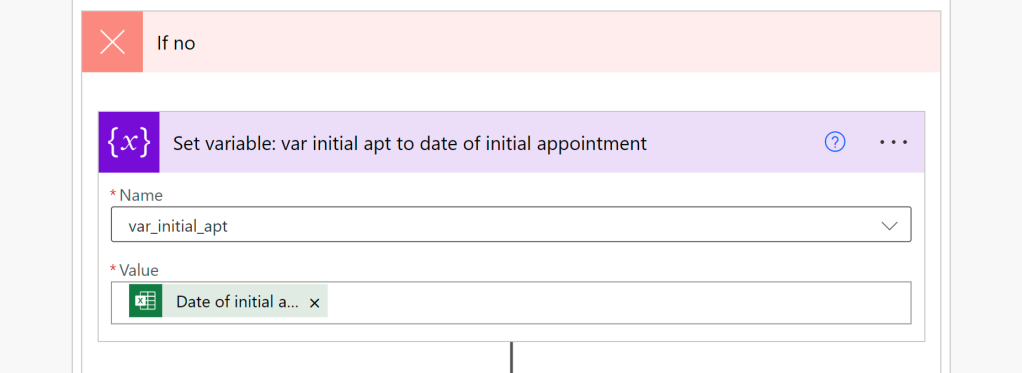
Within the YES column, add the following Set Variable items.
Set Variable Action Name: choose var_initial_apt from the drop down Value: drag the Date of Initial Appointment from dynamic content
Set the var_initial_apt variable to the Date of Initial Appointment field from the Spreadsheet
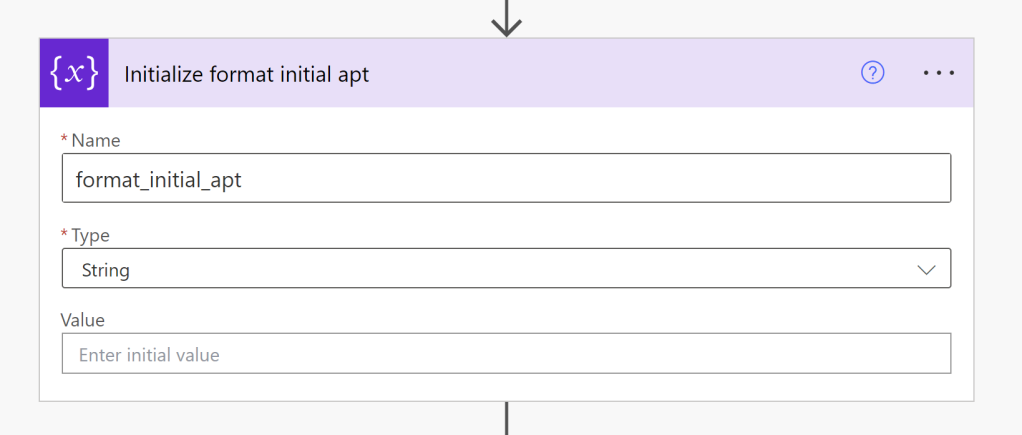
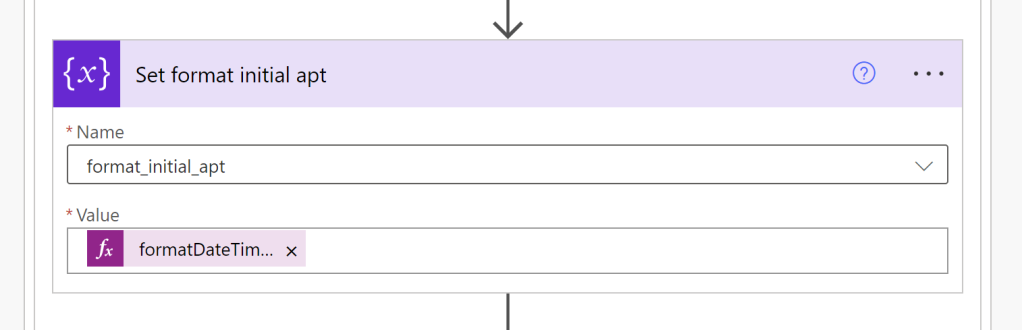
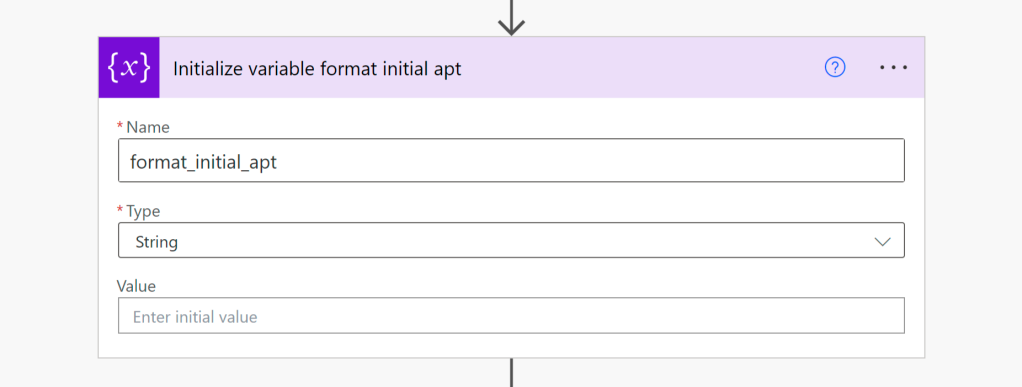
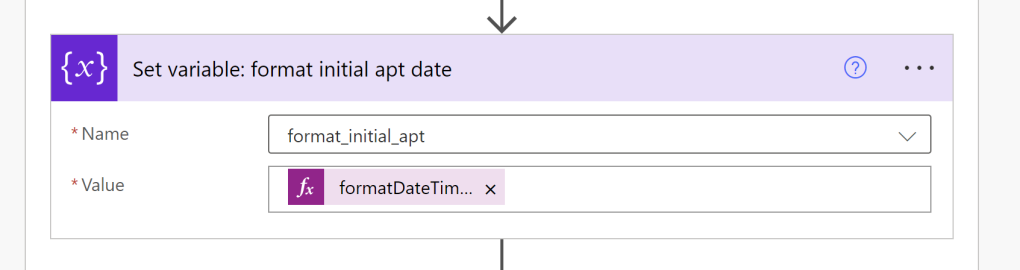
Set Variable Action Name: choose format_initial_apt from the drop down Value: Expression: formatDateTime(variables(‘var_initial_apt’),’MM/dd/yyyy’)
Set the format_initial_apt variable take the initial appointment date and transform it into a regular date format.
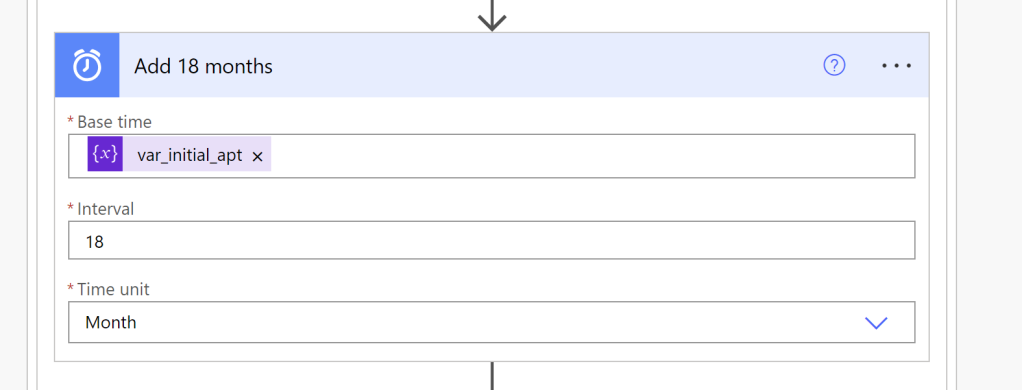
Use the Add Time feature to add 18 months to the initial appointment date. Rename the action to Add 18 months.
Base Time: var_initial_apt
Interval: 18
Time Unit: Month
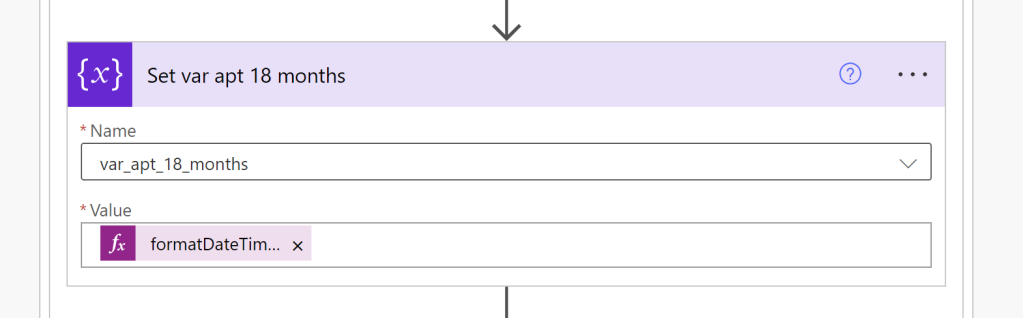
Set Variable Action Name: choose var_apt_18_months from the drop down Value: Expression: formatDateTime(body(‘Add_18_months’),’MM/dd/yyyy’)
Now that we have calculated the date 18 months from the date of initial appointment, we need to assign it to an actual variable var_apt_18_months, so we can continue to use it.
It’s important to note that the ‘Add_18_months’ must match the name you entered in the Add Time feature, replacing spaces with underscores _.
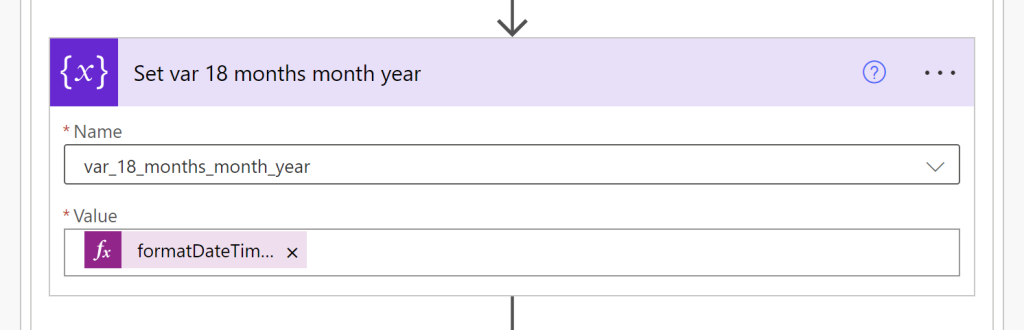
Set Variable Action Name: choose var_apt_18_months_month_year from the drop down Value: Expression: formatDateTime(variables(‘var_apt_18_months’),’MM-yyyy’)
Now that you have set the 18 month variable, we need the month-year version so we can compare it against the month-year of today’s date. We do that with the var_18_months_month_year variable and giving it the date format of MM-yyyy.
To obtain the 2-year anniversary for the faculty member, we use the Add Time feature to add 24 months to the initial appointment date. Rename the action to Add 2 years.
Base Time: var_initial_apt
Interval: 24
Time Unit: Month
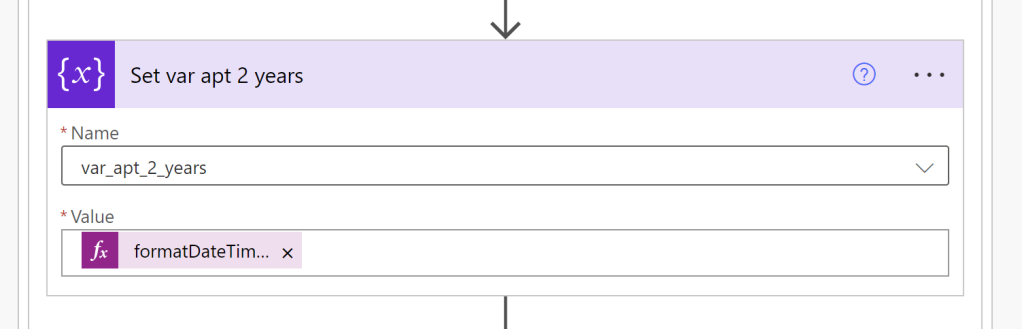
Set Variable Action Name: choose var_apt_2_years from the drop down Value: Expression: formatDateTime(body(‘Add_2_years’),’MM/dd/yyyy’)
Now that we have calculated the date 2 year anniversary from the date of initial appointment, we need to assign it to an actual variable, so we can continue to use it.
formatDateTime(body('Add_2_years'),'MM/dd/yyyy')
It’s important to note that the ‘Add_2_years’ must match the name you entered in the Add Time feature, replacing spaces with underscores _.
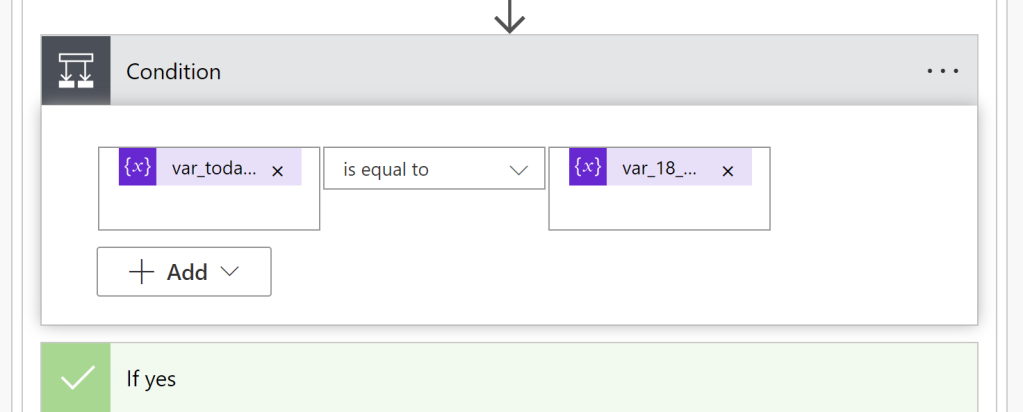
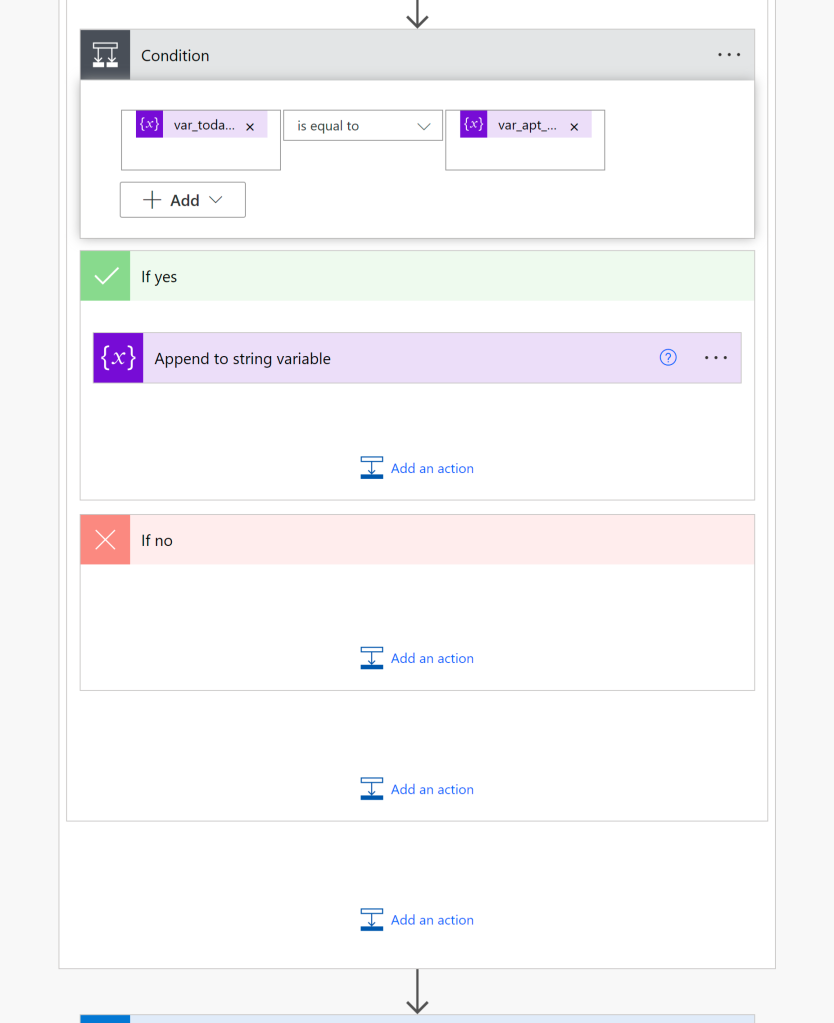
Step 6: Apply the secondary filter
Now that we have manipulated all the dates using the Set Variable feature, we now perform a final filter that says “does the month and year for today’s date match the month and year for the 18 month from the date of initial appointment”
var_today_month_year is equal to var_18_months_month_year
From here you create actions for those that meet the filter criteria above under the YES column. If there was anything you wanted to do with anyone who does not meet the exclusion criteria, you would enter actions in the NO column. In this flow, we won’t be using the NO column for this condition.
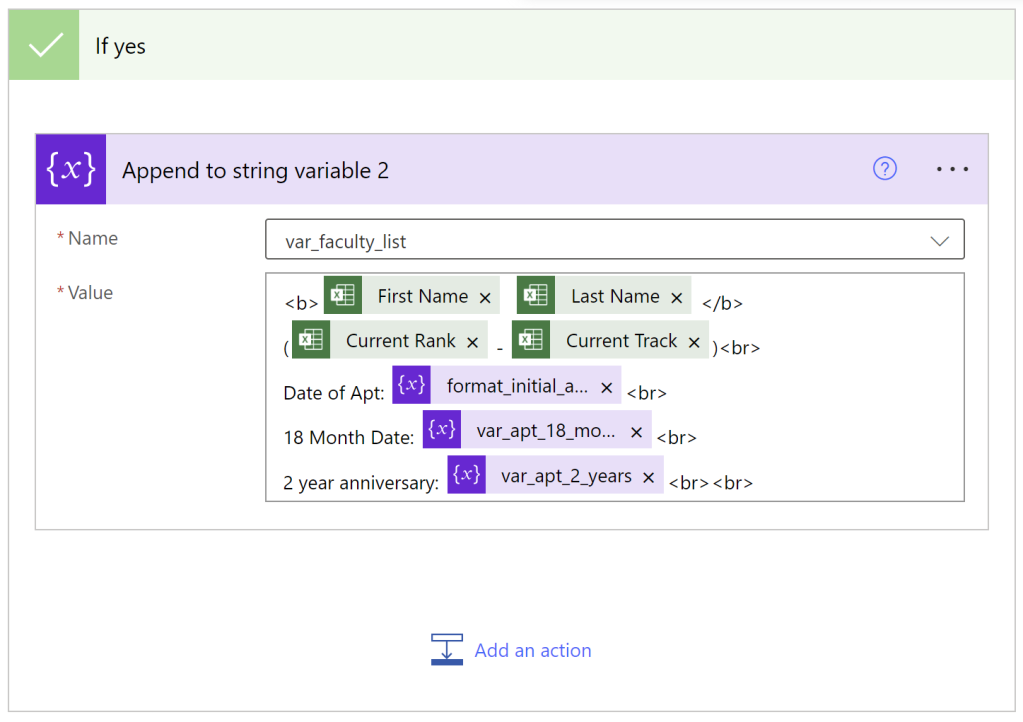
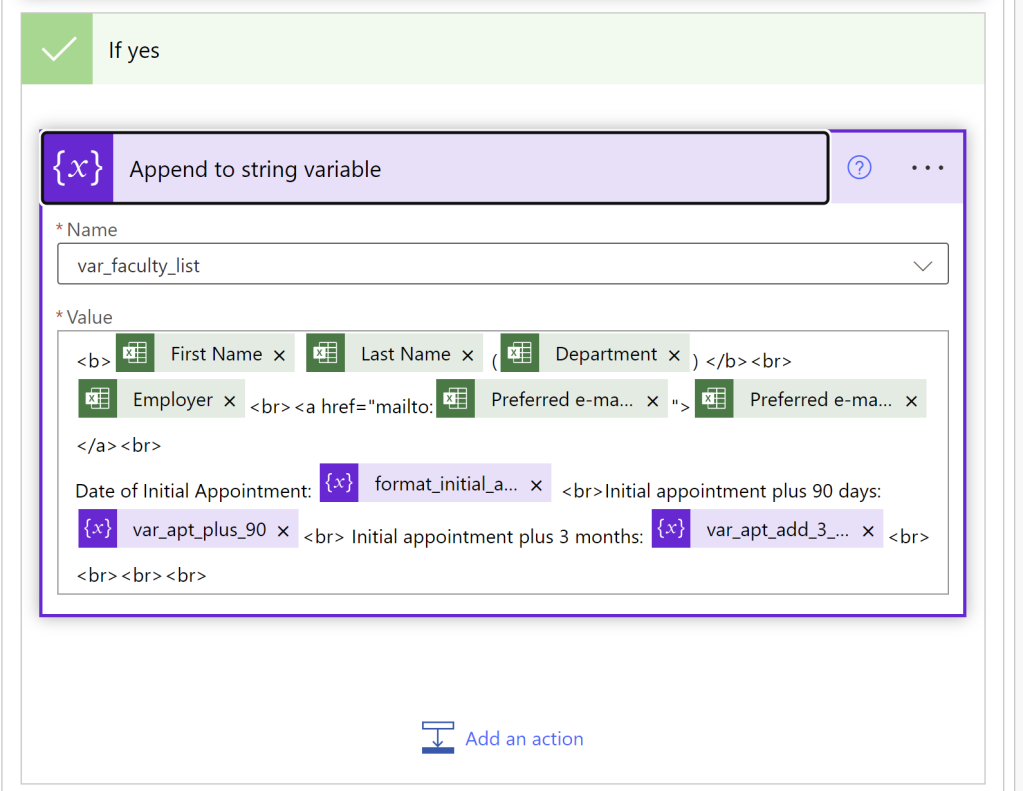
Append to string variable Action Grabs information from the spreadsheet or from the flow. Use the settings below.
Within the YES column, add this Append Variable action
Append the variable var_faculty_list with the data about the faculty member you may want to include, as well as any data you may want to include from the variables we created along the way.
The append variable option allows you to include HTML tags to format your data. In this one, we bolded the First and Last Name by enveloping them in <b> and </b> tags. <br> is used to create new lines.
For each user we extract the following: First Name Last Name (Current Rank – Current Track) Date of Apt: 18 Month Date: 2 Year Anniversary:
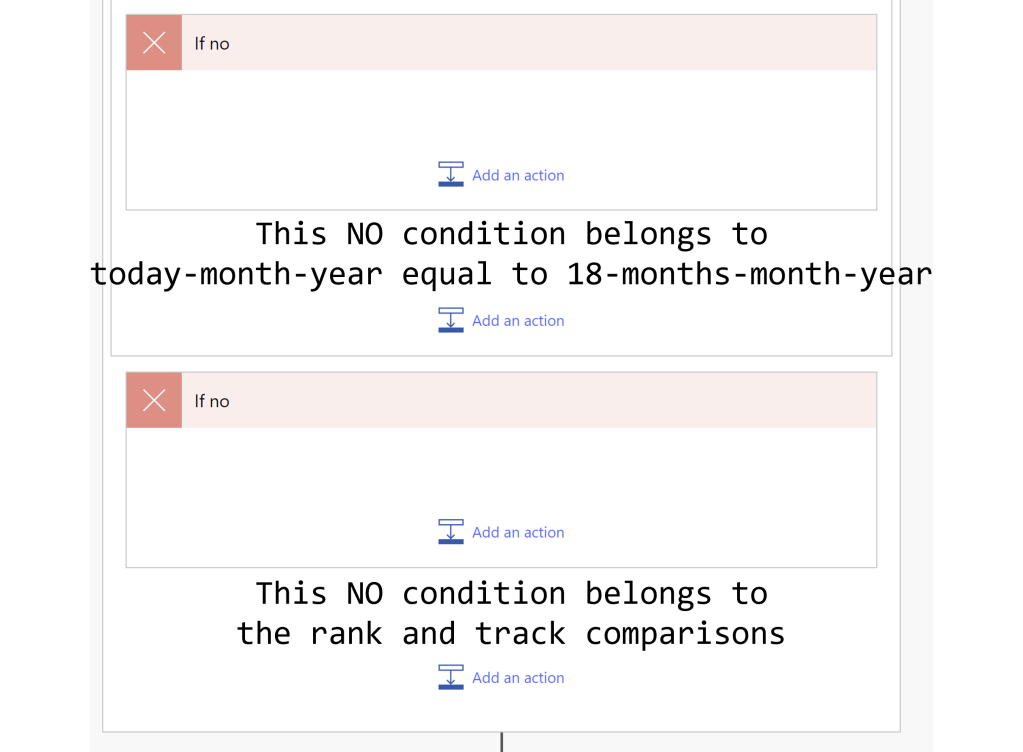
Both NO conditions are blank – we are not performing actions if the filters are not met.
This screenshot is just here to show you that we did not use the IF NO portions of either of the conditions / filters we set above. The first NO applies to the month-year filter. The second NO applies to rank and track filter.
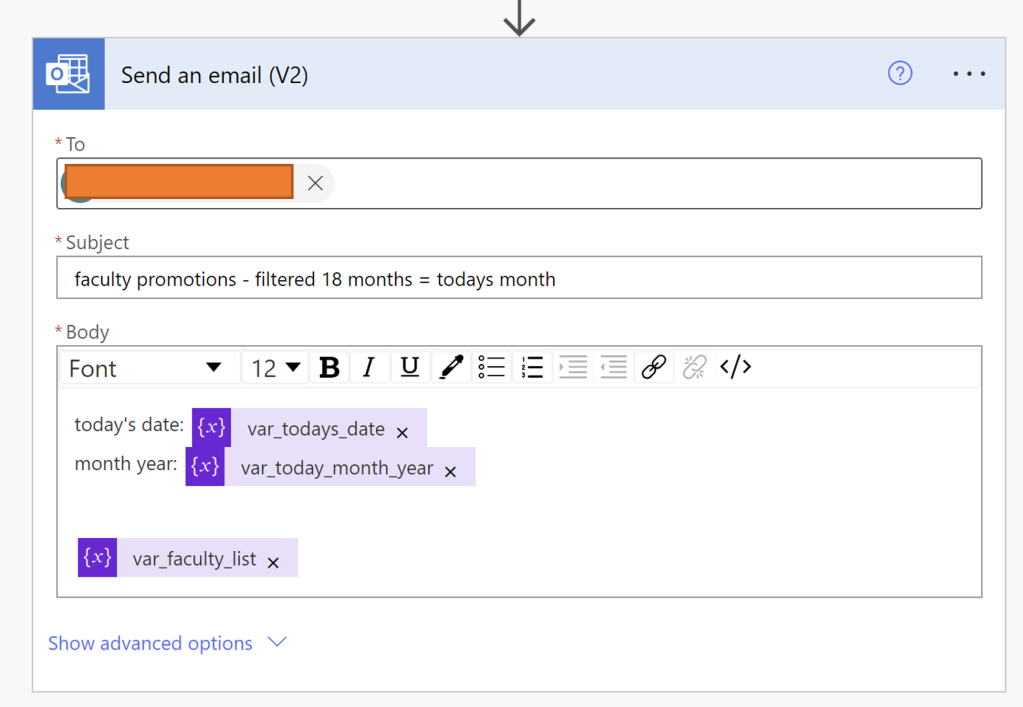
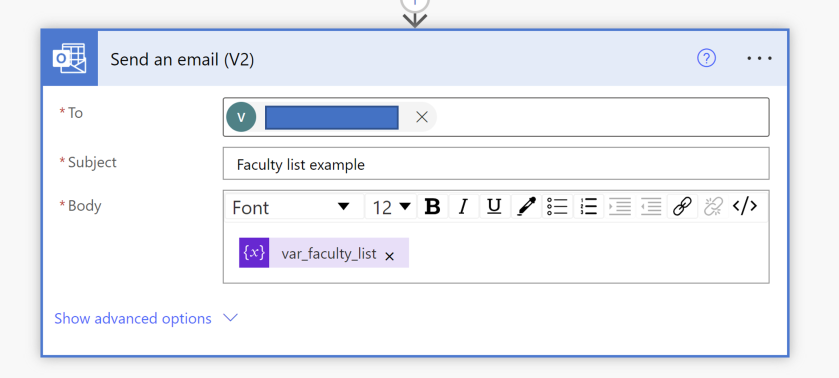
Step 7: Send the email
Below ALL the conditions (and make sure this is below all the conditions, at the VERY end of the flow) add the Send an Email action.
Send an email (V2) Action This action creates an email.
Add the recipient, the subject line, and then whatever content you want inside the email.
This one opens the date with today’s date, the current month and year, and then it adds the faculty list that was gathered in the append var_faculty_list variable.
Final note:
This flow generates a report with the people who meet the criteria. There are several ways in which you can modify this flow to where it would send emails directly to the faculty members with a note to let them know their 2 year anniversary is coming up. You might want to include a link to instructions, or send along an attachment with the form they might use. The client in this case wanted a report so they can craft their own emails and personalize them.
Because the lists generated here are fairly short, this customization will likely work. If you were needing to send hundreds of emails each month, you would want to automate that. Look for a future post to show what that would look like.
Four year notifications
The faculty affairs leader also wanted a report for people nearing their four year anniversary so that they too can receive reminders. In order to do that, just change the 18 months to 42 months, and the 24 months to 48 months in the above Add to Time functions.
We all use the mouse button to place the cursor in a Word document, Spreadsheet, etc.
You may know that if you double-click the mouse button within a word, the application will select a whole word.
But are you familiar with the various ways that triple-click can make your life easier?
Here are some common behaviors associated with triple-clicking:
Selecting a Paragraph: In many text editors or word processors, triple-clicking on a paragraph selects the entire paragraph. This can be a convenient way to quickly select and manipulate blocks of text.
Selecting a Line: In some applications, like code editors or plain text editors, triple-clicking on a line selects the entire line of text.
Selecting a URL: In web browsers, triple-clicking on a URL usually selects the entire link, making it easier to copy or open.
Ooops. You just just accidentally closed a browser tab you were looking at and you just lost the website you were looking at. You don’t know what the address was, but you still want to go back to read it.
You can go to the browser history and try to restore it there.
A quicker way might be to use the combination shortcut of Ctrl + Shift + T.
Holding down both the Control and Shift keys, followed by hitting the letter T will restore the last browser tab you closed. It can also restore an entire window of tabs if you accidentally closed the entire window.
Conversely, Ctrl + T will open a brand new tab without you having to use the mouse to click to open a new tab.
This works for Google Chrome, FireFox, and Microsoft Edge.
This is the complete power automate sequence I created for our faculty list project. The purpose of the project was to automatically send an email on a monthly basis. The email should list the people who joined the faculty three months prior. We start by creating a number of variables using the Initialize Variable actions. Then we open an Excel file, and for each row, we first make sure there is data in the row itself, and then we perform some calculations to add 90 days to each appointment date. If the month and year of the 90-day variable match the month and year of today’s date, then we add the information from that row into a string called var_faculty_list that is destined to be included in an email. When all of the rows have been reviewed, the var_faculty_list variable is added to an email and sent to the head of faculty affairs.
If you need help with some of the steps or need extra information, refer to the individual parts in this series:
I hope you found this series helpful as you begin your Power Automate journey. If you know of better or more efficient ways of accomplishing the same task, feel free to add a comment to this post.
NOTE: the formulae in the captions are not code formatted, so any quotes will need to be turned to foot marks ‘ within the Expression box
Full sequence
We start with setting the recurrence of the flow. For testing purposes, you may want this set to every hour, but for practical purposes, set this to your required recurrence. In my case, it’s monthly.
Set your recurrence to once a month.
Initialize all the variables
Next we initialize all the variables we need. I put them all at the beginning so that I knew where they were.
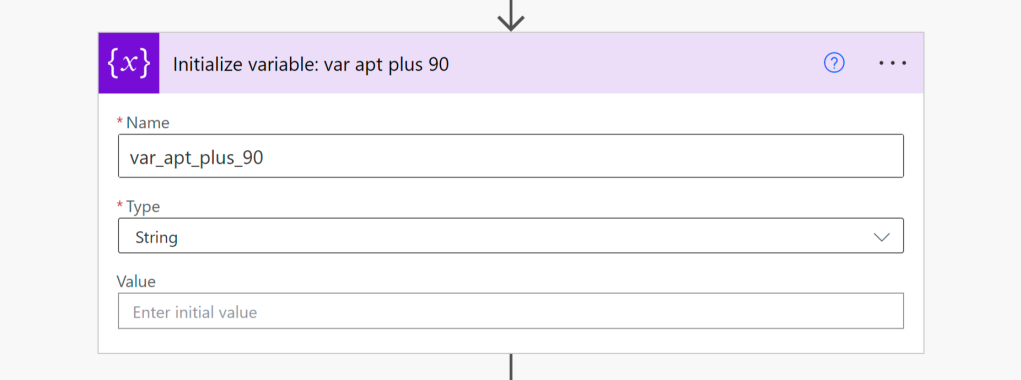
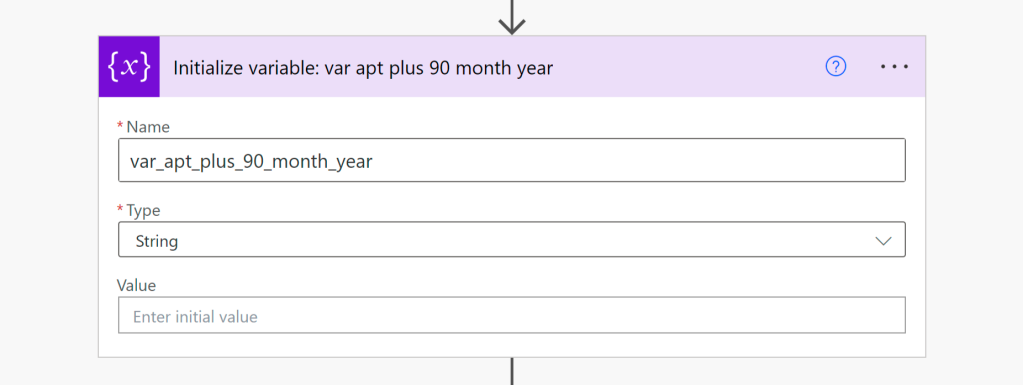
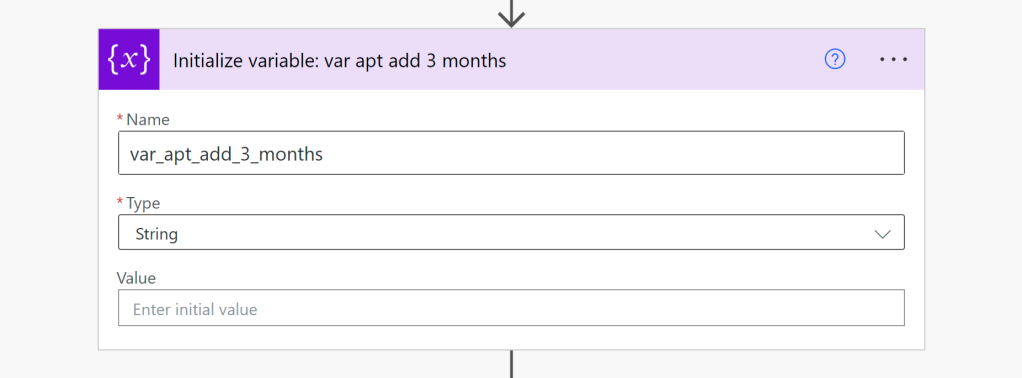
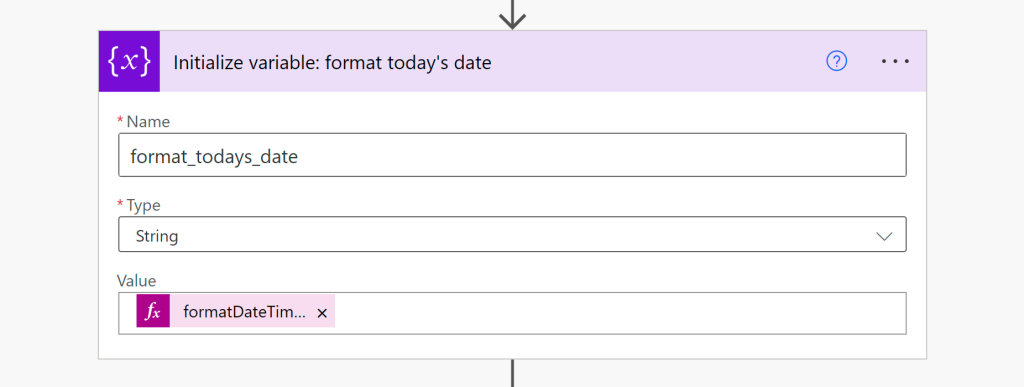
Initialize the var_todays_date variable as a String with the initial value of expression utcnow()Initialize the var_today_month_year variable as a String with initial variable of expression formatDateTime(variables(‘var_todays_date’),’MM-yyyy’)Initialize the var_initial_apt variable as String. Leave Value blankInitialize the var_apt_plus_90 variable as String. Leave Value blankInitialize the var_apt_plus_90_month_year as String. Leave Value blankInitialize the var_apt_add_3_months variable as String. Leave Value blank The purpose for this is an alternate to 90 days. Three months might be more accurate.Initialize the variable format_todays_date as String with initial variable expression of formatDateTime(variables(‘var_todays_date’),’MM/dd/yyyy’)Initialize the format_initial_apt variable as String. Leave Value blankInitialize the var_faculty_list variable as String. Leave Value blank
Access the Excel file
As noted in Part 1, the important thing to do here is to set the Format of DateTime to ISO 8601
Enter the location, the document library, the file, and the name of the table. Then from the Advanced options, ensure that DateTime Format is set to ISO 8601.
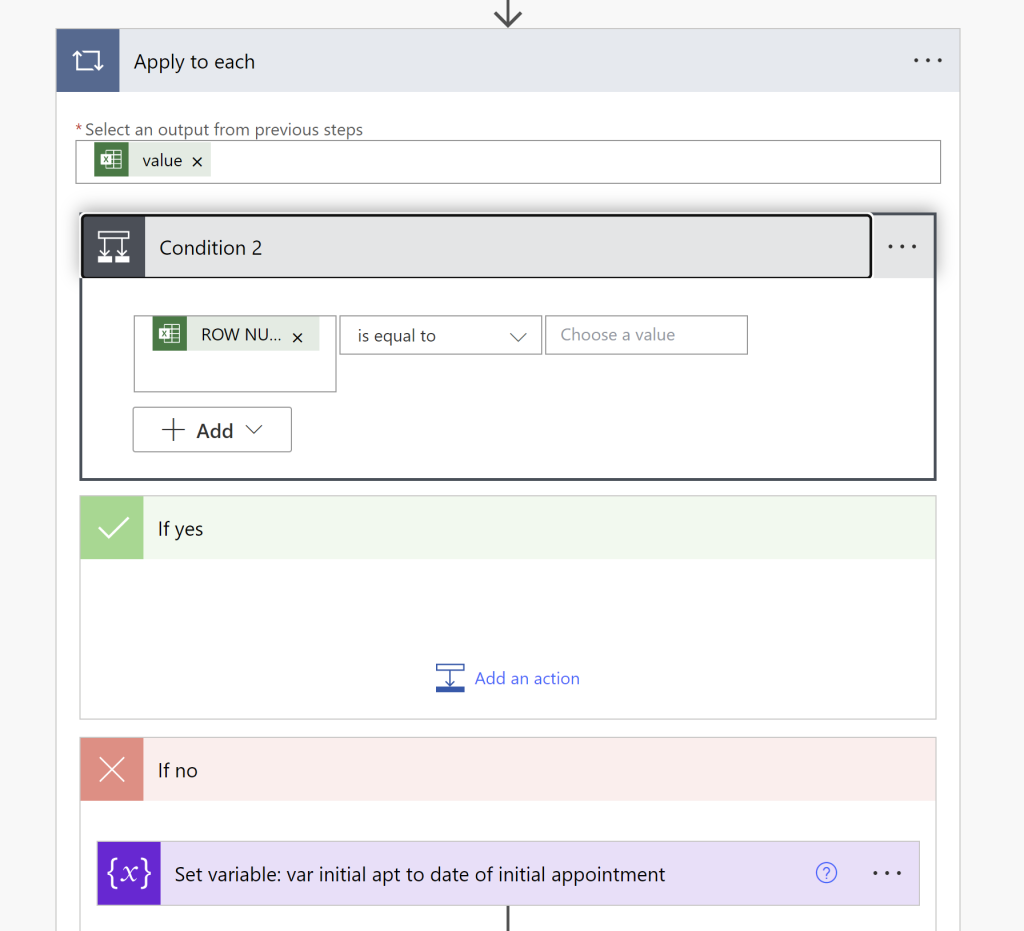
Apply to each – Add the condition that ensures that the row is not blank
First we want to make sure that we are working with rows that contain data. This condition ensures that. It checks that the ROW NUMBER field is blank.
If YES (the row is blank), then nothing happens, and it moves to the next row.
If NO (the row contains data), then the rest of the flow occurs.
The first Apply to Each action checks to see if there is data in the row. If it is not blank, it continues.
Set each of the variables inside the loop
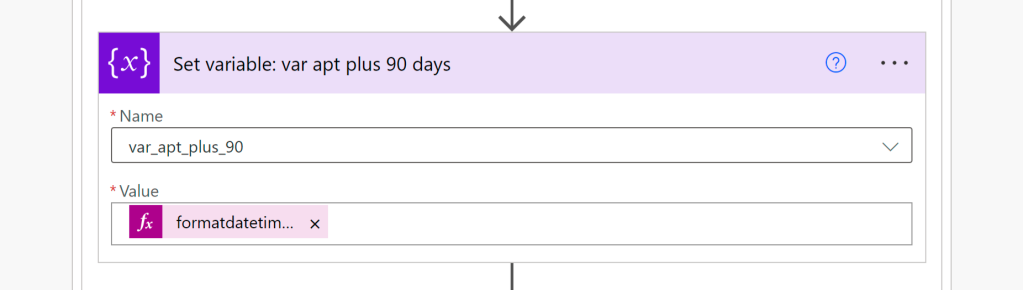
The first action inside the NO field is to set var_initial_apt to the Date of Initial Appointment field from the spreadsheet.Next we format the initial appointment date to make it more user friendly. In the value field enter the expression formatDateTime(variables(‘var_initial_apt’),’MM/dd/yyyy’)Next we set the var_plus_90_days variable with a combination formula that both adds 90 days and sets the format to make the date more user friendly. In the value field enter the expression formatdatetime(adddays(variables(‘var_initial_apt’),90),’MM/dd/yyyy’)
Optional – 3 month version
Optional: If you want to set 3 months instead of 90 days, use the next two actions. If you are fine to just use 90 days, you can skip these.
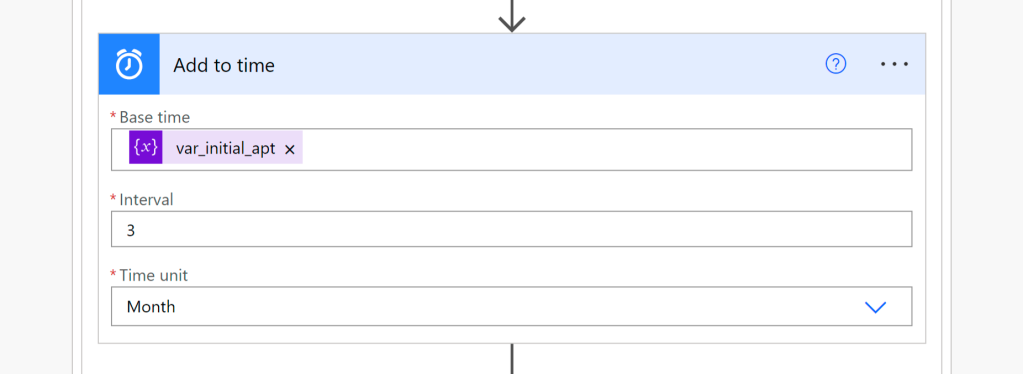
Use the Add to Time action with the following settings: Base time: var_initial_apt Interval: 3 Time Unit: MonthYou would set the var_apt_3_month variable with the following expression formatDateTime(body(‘Add_to_time’),’MM/dd/yyyy’)
Note that the body(‘Add_to_time’) is the variable that you’re formatting here.
RESUME OUR REGULAR PROGRAMMING
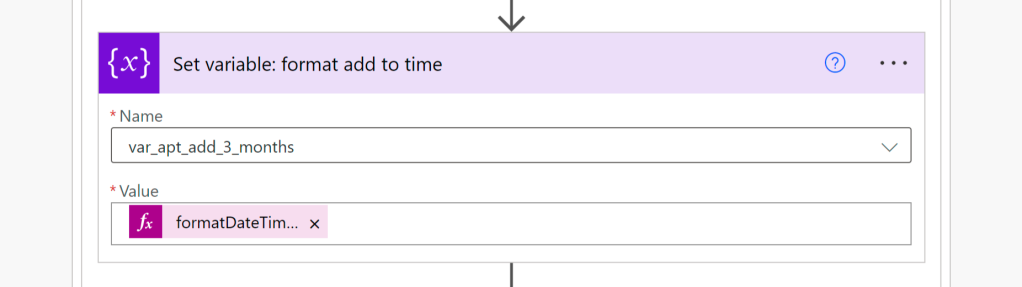
For this next action, choose the variable you want to use – either the var_apt_add_3_months or the var_apt_plus_90.
The purpose of creating this variable was to set the month-year of the 90 day appointment, so we can compare it against the month-year of today’s date.
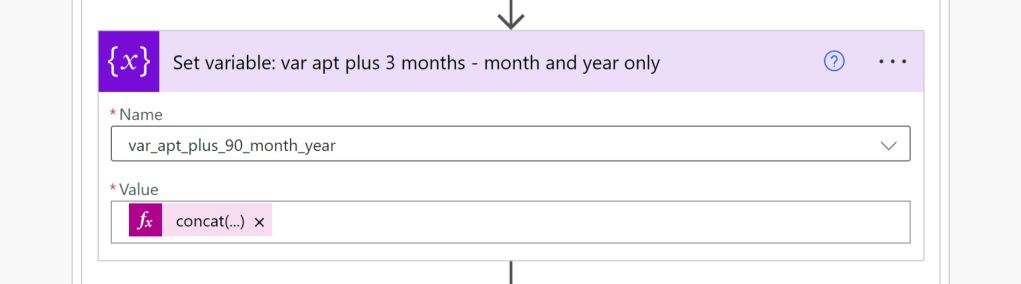
Set the var_plus_90_month_year variable to generate a month-year format using one of the expressions below formatDateTime(variables(‘var_apt_3_months’),’MM-yyyy’) formatDateTime(variables(‘var_apt_plus_90′),’MM-yyyy’)
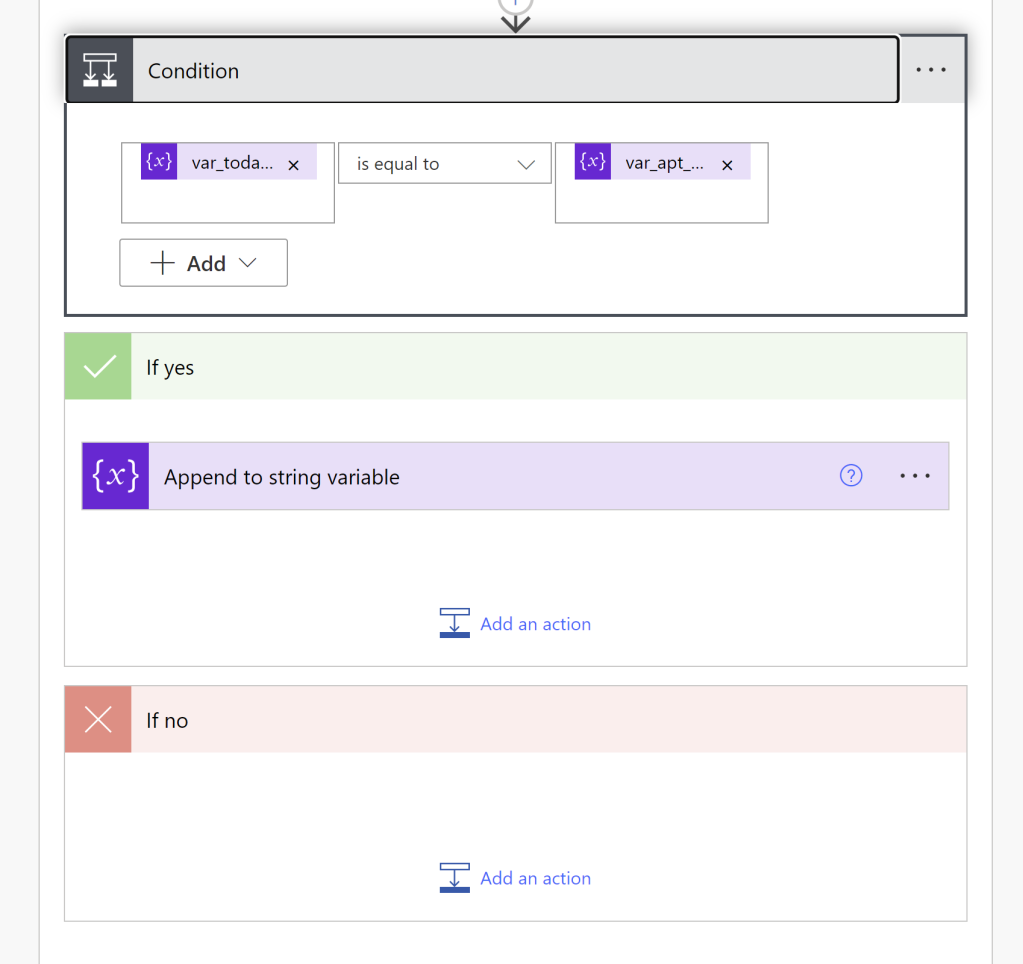
Apply to Each – Adding a condition comparing the month/year values
This is where the magic happens… if var_today_month_year matches var_apt_plus_90_month_year.
If the month and year for today’s date matches the month and year of the 3-month anniversary for our faculty member (IF YES), add their info to the faculty list variable.
If they do not (IF NO), then do nothing and move onto the next row.
You’ll note how there are several add to actions showing here… The first one is the IF NO action. The second one is there in case there is an action that needs to happen after the YES/NO condition has been reviewed. The third one is still part of the prior (if the row is not blank) condition. In the image above you’ll see a partial Email Send screen which happens after ALL Apply to Each actions have been resolved.
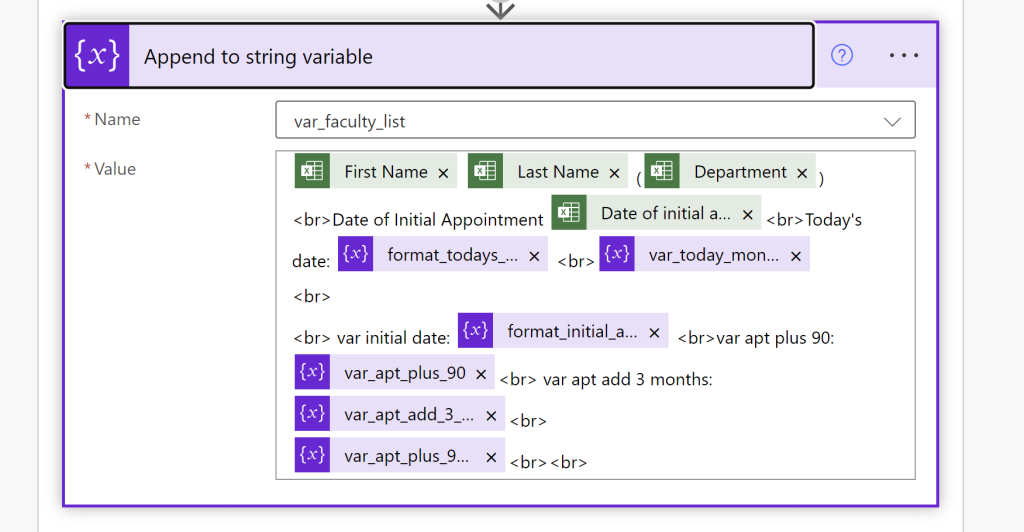
This next screenshot shows the details of the append to string variable from the above conditional screenshot.
You can include all kinds of variables, from the spreadsheet, and from the flow into the append to string variable action.
This screenshot shows first name, last name, department bolded with <b>, then employer information and the email address of the faculty member formatted with <a href code to make in an active link. It also includes the various dates in MM/dd/yyyy format. This is what was presented to the client, so they could choose which of the dates they would want. 90 days is slightly different than 3 months. My client chose 90 days. Yours might choose a different option. That is why I provided both versions of calculating in this page.
Time to send the email
It’s almost anti-climactic at this point, but the final piece to the puzzle is to actually send the email out to the user.
Use the Send an email action to generate the email. Add your recipient to the TO field, add a SUBJECT, and add whatever content you wish to add to the BODY. As part of the content, add the var_faculty_list string, which contains all the faculty members whose 3 month anniversary appears in today’s month.
This next piece is optional, but I wanted to use normally formatted dates in the body of the email, so I needed to change or create new variables to handle that.
format_todays_apt with initial value of formatDateTime(variables(‘var_todays_date’),’MM/dd/yyyy’)
format_initial_apt_date with initial blank value and set value of formatDateTime(variables(‘var_initial_apt’),’MM/dd/yyyy’)
You can also add the formatDateTime formula on the outside of other expressions, such as this example where I changed the formula for the var_apt_plus_90 variable to include the formatdatetime piece: formatdatetime(adddays(variables(‘var_initial_apt’),90),’MM/dd/yyyy’)
This web page can give you some additional options for formatting date and time
One thing that I ran into was that I had a table size that was larger than the data set inside the table. e.g. our faculty list had 850 filled rows, but I had set the table to be 1000 rows so that the data set could grow and not inadvertently cut off the newest faculty members because someone didn’t update the table size.
What I did not realize was that Power Automate would throw an error because it encountered an empty row. It gave me an esoteric error that I did not correlate to “empty cell” or “missing data” until I happened to click on “next failed” record in the run history.
I really wish that developers of computer programs would learn to speak human. A simple error of “Hey, this field is blank” would have sufficed. Having to Google error text is really not a great user experience.
I looked for all kinds of ways to create expressions for finding empty rows but they were all so complicated, without full instructions, that I decided to look for something else. I decided to go the easy route.
If you have a field like ROW NUMBER, that’s great. Technically, you could pick any field that would generally never be empty, like ID number, or name, or something else.
In my spreadsheet, I already had a field called ROW NUMBER that contained integers.
Inside the Apply to Each action, I added a condition action that said if ROW NUMBER is equal to
and then left the other field blank.
I then moved all the remaining Apply to Each actions into the NO column so that if ROW NUMBER is not blank, perform the actions.
If you’re one of these people who prefers to have all actions in the YES column, you would change the condition to ROW NUMBER is not equal to, and leave the field blank.
Adding this condition to the whole process allowed the flow to continue whether the row is empty or not.
Now that we have created the variables, added them to an email, we know that all the data is solid and that the flow works.
Now we can add the condition statement (think IF statements for spreadsheet and computer users) to filter what we need.
Remember, our goal for this project was to only display the people that joined our faculty 3 months ago.
There may be a number of approaches you can use to do the comparison. The way I chose to do it was to compare the month and year for today against the month and year for the 90 day variable.
The Condition action allows you to compare values and then add actions. Note that the append to string variable has been placed inside the YES condition, and that the NO condition is blank.
To do that, you add a condition action
In one field you add var_today_month_year
In the other field you add var_apt_plus_90_month_year
Set the condition to IS EQUAL TO
Then move the Append to String Variable action into the YES condition so that it will ONLY append the data from the row IF the two month-year variable match. i.e. if 2023-06 matches 2023-06.
Leave the NO box blank (so that nothing happens if the month-year fields don’t match)
We’re nearly there, thanks for sticking with it. In Part 1, we set up the spreadsheet and the initial Power Automate connection. In Part 2, we created the variables we needed. In Part 3, we set the variables and performed some calculations. Now that we’re in Part 4, we’re collecting all this information and putting it into an email.
To collect data from multiple rows to be included in one email, you need to use the Append a Variable action and then you place the Send an Email feature AFTER the Apply to Each action set.
NOTE: If you wanted to send a separate email for each row, you would use the Send an Email feature INSIDE the Apply to Each action set, and you likely would not use the Append a Variable action to gather the data, as you can place the content directly into the Send an Email action.
PRO TIP: In truth, you would probably do this part early on in the process, so that you can collect information from your variables and test your formulae along the way, but for blog purposes, I made this a separate topic.
You can use HTML within the append to string variable field to format. You can mix data from the spreadsheet with data you created from the variables.
In Part 2, we created/initialized a variable called var_faculty_list as a string. In this part, we are going to use the Append a Variable action to add content from each row in Excel, as well as content derived through our calculations, into this one variable. The word append means “to add to.”
The append to variable action allows you to enter plain text, HTML, as well as content from your spreadsheet and any variables you created inside the flow. You add items to the append action by dragging them from dynamic content into the field.
Some formatting tips include
Using spaces to separate the data (so that you get firstname lastname, and not firstnamelastname)
Using parentheses around fields if they are informative e.g. Corey Smith (Surgery)
Using <br> HTML code to create a new line between data
Using <b> before, and </b> after data that you would like to bold e.g. <b>Corey Smith</b> becomes Corey Smith
You can use any HTML code to build and format your var_faculty_list string
You can add as many people in the TO field as you like.
Now that you have gathered all the data, it’s time to send the email. Add the Send an Email action BELOW or AFTER the Apply to Each action set.
Enter the recipient’s email address, the subject line for the email, and inside the body, place the var_faculty_list variable.
When you test your flow, you should receive an email with all your data.
PRO TIP: If you test your flow and it fails, before you change any of the expressions, check the failure points to see if they failed at every step, or just after a certain number of records. If it’s the latter, your table may have some empty rows or data in it.
I would much prefer that Power Automate sends me an error saying “sorry, couldn’t process an empty field” than whatever esoteric message the computer provides such as “Column 0 list 0 unable to process Set a Variable”
When this happens, you may need to change the table size in your excel file to ensure you don’t have any empty rows below your data. You do that by clicking within the table, then under the TABLE DESIGN tab, choosing resize table. Check to make sure that your table size only includes rows with data.
In future steps, we can add a condition to the Power Automate flow so that it will not process steps if the data is blank, so that you can set your table size to allow for growth, but for testing purposes, let’s see if this helps.
PRO TIP: this is also why it is a good idea to add your data to either the append variable or the send an email from the very beginning, so you can check to see, is it passing the name of the person? Great. Is it passing today’s date? Great. Is it passing the initial appointment date? Great. Is it passing the plus 90 variable? Oh, now it fails. Is it failing for every record, or just some?
By testing your flow at the addition of each variable, you can better track what is going on with your flow as you go, because the reasons for failure are often esoteric and not helpful at all.
Thank you for your patience as we went through the setup phase of this Power Automate process. In Part 1 we prepared the spreadsheet and connected it to the Power Automate flow. In Part 2 we created variables that we can now use to do some calculations.
In my example here, I created all the variables above the Excel List Rows function. I don’t think you necessarily have to do it in that order, but it just made sense for me to do it that way.
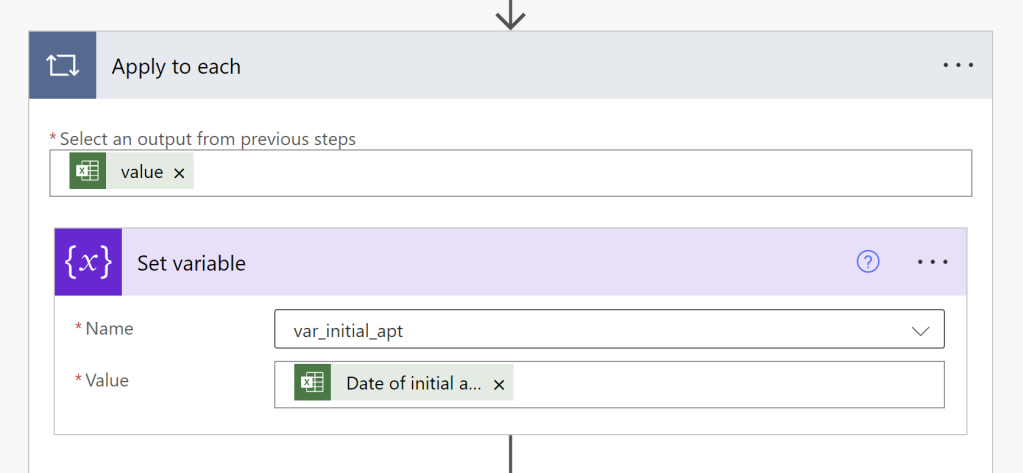
Because need to compare the information inside each individual row, we will need to use the Apply to Each action. From dynamic content, add the value field to the “select an output from previous steps” box. Adding value here is like adding the content from the entire row, which is what we want to do.
Apply to each lets you pull data from each of the rows (value)
Next, we are going to pull the initial appointment date from the row. In order to do that, add the Set variable action, and from the dropdown, choose var_initial_apt. In the value field, drag the column in your spreadsheet that you want to manipulate. In our case, it was called “Date of Initial Appointment.”
adddays(variables(‘var_initial_apt’),90)
Now that we have our initial appointment date, we’re going to add 90 days by adding another Set Variable action, this time choosing var_apt_plus_90 from the dropdown. We are going to use the “add days” formula (otherwise known as expression). In the value field, use the expression builder to enter the adddays(variables(‘var_initial_apt’),90).
The key pieces to this formula: adddays(the field you want to add dates to, the number of days). Because we are adding days to an existing variable, we need to tell it to look at variables, and inside single quotations, then give it the specific name of the variable we want to use. variables(‘var_initial_apt’)
The next field we set is var_apt_90_month_year. You can use the format date sample expression builder feature to provide you the following expression: formatDateTime(variables(‘var_apt_plus_90′),’MM-yyyy’)
Now that we have set all the variables, and performed some calculations on them, it’s time to put the whole thing together.
In Part 4, we will work on appending all the data into one string, and then sending a sample email with all the data. In Part 5, we will use the condition feature to compare today’s date against the 90-day field and filter our results we want.