Turn off the default Teams Meeting feature in Outlook

By default, whenever an individual creates a meeting inside Outlook an online link to Teams is automatically generated. For users who use Zoom for their meetings, this default and automatic feature can cause some confusion. Thankfully, there is a way to disable this feature in both the Online and Desktop versions of Outlook.

Online Version of Outlook

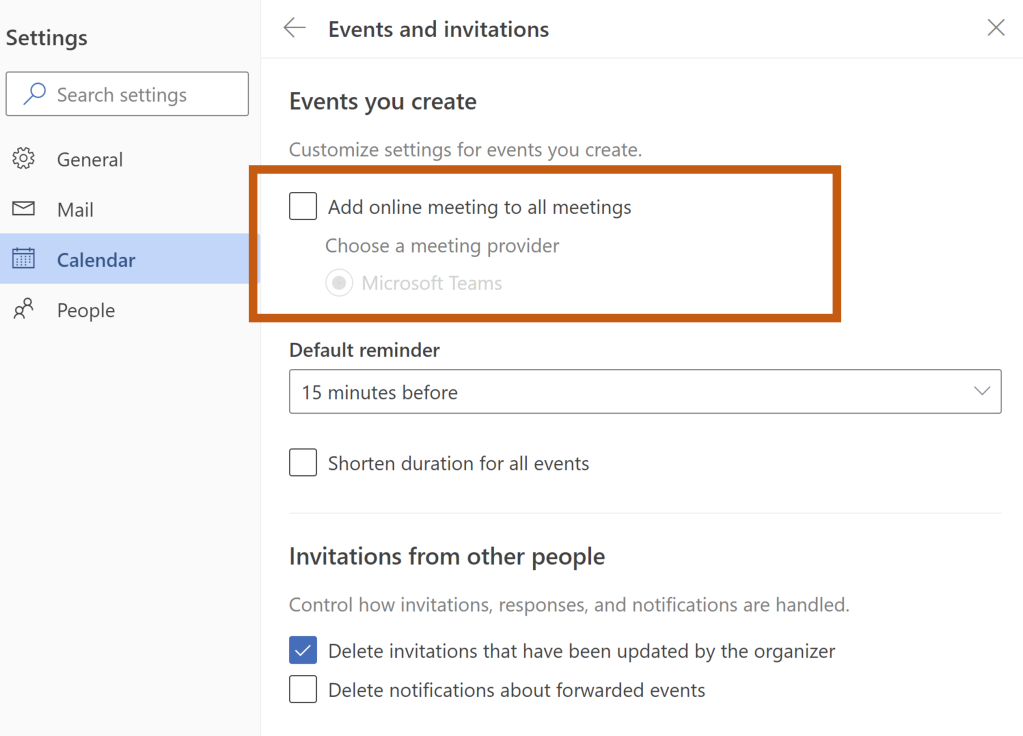
For the online version of Outlook, use the GEAR button at the top right to activate the settings menu. Then click on Calendar / Events and Invitations to show this menu. Uncheck “Add online meeting to all meetings.”

screenshot of events and invitations screen in Outlook Online. A border is placed around the settings for Add online meeting to all meetings. The box is unchecked.
To turn off the MS Teams default, UNCHECK the box next to Add online meeting to all meetings

Desktop Version of Outlook

For those using the Desktop version of Outlook, watch the first 90 seconds of this video to learn how to turn off the feature in Outlook Desktop.

How to disable default Teams meeting in Outlook

Using Room Finder in Outlook

With the added features that Exchange Online brings with it, we have the capability of making room bookings much simpler for users at the university. We will be converting the rooms from “mailbox” to “room” accounts, and as a result you will be able to use the room finder feature in Outlook and in Office 365 Calendar.

This article specifically addresses the functionality in Outlook. A future article will talk about the changes in Office 365 Calendar.

Currently, we only have a few actually setup as rooms in Outlook. All the other rooms are in the address book as “people” rooms, as shown in this image below. Burrus 110, 123A and 116 show up as “people” and Burruss 201K and 400A are in the system as Rooms.

The current process for reserving a room using the Scheduling Assistant in Outlook is to search for the room name in the Address Book using the Add Attendees option rather than the Add Rooms option.

When Virginia Tech does the room conversion, you will be able to click on Add Rooms and select your rooms from the rooms list.

Bonus Tip:

When creating a new meeting, you can quickly check the availability for all the rooms in your building by adding them all to the meeting.

From there, you can see the availability, and either remove or uncheck the rooms that have meetings in them. Then you can confidently schedule your meeting, knowing your room is available for your use.


What is the Focused Inbox?

As you explore the Exchange Online environment, you will notice that Microsoft added a new feature called Focused Inbox. What does this do and why is it helpful?

Focused Inbox helps you sort your mail and display what’s most important to you. As a default, the Focused Inbox looks at whether your name is listed in the TO or CC field and delivers that mail to the Focused Inbox. If the mail you received was from a mass distribution list such as an online newsletter or mailing list, or a Google or Office 365 Group, the email will appear in the Other Inbox.

You can teach the Focused Inbox how you would like to receive your mail going forward by right-clicking your email and choosing Move to Other or Move to Focused Inbox from the drop-down menu.

Using the Focused Inbox can help you sort through the clutter that you might have if you subscribe to a lot of mailing lists or you are a member of a number of Google or Office 365 Groups.

To learn more, visit the Focused Inbox for Outlook page at https://support.office.com/en-us/article/Focused-Inbox-for-Outlook-f445ad7f-02f4-4294-a82e-71d8964e3978?ui=en-US&rs=en-US&ad=US


Exchange Online: New features coming your way!

This is a modified version of an article I wrote when we initially moved over to Exchange Online. I thought this might be valuable to others who are making the transition.

Yay! Exchange Online is now a reality! I am excited about all the features we will now have available to those of us who decide to convert over to Exchange Online.

Improve your collaboration experience with Office 365

If this is your first time on the Office 365 Suite, welcome! We hope you will enjoy having access to your favorite Office applications in the cloud – or web – environment. You will now be able to store your files online and access them from anywhere, and view or edit them in your favorite browser.

If you are already familiar with and using the Office 365 Suite, then you will enjoy the additional features that were activated as the result of your migration. You now have full functionality of Office 365 Groups, Microsoft Planner, and the latest addition to our Office 365 platform: Microsoft Teams.

We encourage you to explore these new applications and their features using the resources below:

Learn about Office 365 Groups
https://support.office.com/en-us/article/Learn-about-Office-365-groups-b565caa1-5c40-40ef-9915-60fdb2d97fa2?ui=en-US&rs=en-US&ad=US

Office 365 Groups in Outlook on the Web
https://blogs.office.com/2016/11/17/introducing-a-new-file-experience-for-groups-in-outlook-on-the-web/

Microsoft Planner
https://blogs.office.com/2016/06/06/microsoft-planner-ready-for-showtime/

Microsoft Teams
https://blogs.office.com/2016/11/02/introducing-microsoft-teams-the-chat-based-workspace-in-office-365/

Save time using Format Painter

A feature that I use so often I almost take it for granted, is the Format Painter, which allows me to quickly copy formatting from one thing in a document to another.

The Format Painter tool appears under the HOME tab in most of the Microsoft Office programs. In Outlook it appears in the MESSAGE tab. It looks like a little paint brush.

Sometimes all you want to do is make the formatting of one thing match another. I have several practical applications for this. Most notably, any time you copy something from one program to another.

As much as Microsoft likes to think that formatting is the same across the board, it’s mistaken. Copying information from Word to OneNote or from OneNote to Outlook, I always end up having to update the formatting. Using Format Painter lets me do that very quickly.

To use the Format Painter tool, select a part of the document (the in case of Excel, the cells) that contain the formatting you want.

Click the Format Painter tool, and then select the part of the document (or cells) that need this formatting. Voilà!

BONUS TIP: If you double-click on the Format Painter icon, it will maintain the formatting copy function which allows you to paste the formatting to multiple locations within the document.

Quick Access Toolbar

In older versions of the Microsoft Office suite of products all the commands lived within menus, not in the ribbon as they do now. There was a section of the user interface where you could “dock” various often-used functions, such as font manipulation, open/close/print, etc.

When they went to the ribbon look, Microsoft thankfully didn’t forget us folks who had gotten used to these quick-click functions, and left the Quick Access Toolbar in-tact, which above the tabs.

Each application has slightly different default options, and also offers slightly different commands specific to the application.

WORD EXCEL
Quick Access Toolbar - Word Quick Access Toolbar - Excel
OUTLOOK ONENOTE
Quick Access Toolbar - Outlook Quick Access Toolbar - OneNote

If you haven’t played with the Quick Access Toolbar, you could miss out on placing some of your most commonly used featured in an accessible spot.

In Outlook, I added the Edit Message feature to the Quick Access Toolbar because I couldn’t find it in the ribbon. I also created new buttons to play my macros that create email templates and clean up my inbox, etc.

I tend to use this toolbar more when I am doing repetitive work. In my current position I have such variety that I haven’t had a need for adding features to the Quick Access Toolbar.

Ribbon Toggle Button – hide and show your ribbon easily

How many of you know about the Ribbon Toggle Button that appears in all of the Microsoft Office suite of products? The little button appears in the top right hand corner of Microsoft products, next to the minimize, maximize/restore, and X to close buttons. It’s a little up-arrow in a window. I don’t know if I ever noticed it was there, and even if I had, I might never have thought to click on it.

This little button lets you toggle the ribbon and choose between Auto-hide Ribbon, Show Tabs and Show Tabs and Commands.

Microsoft Office: Ribbon Toggle

Auto-hide hides pretty much everything including the main window controls, replacing them with the ellipses, which will temporarily show the ribbon and other window controls so you can minimize, maximizer/restore buttons so you can use them before the ribbon hides again. While a nice feature to reduce clutter, I doubt I will use the Auto-hide function very often.

Microsoft Office: Ribbon Collapse

The Show Tabs option returns the Quick Access Menu as well as the tabs (or menu bar). At the very least I like to have this view turned on, so I can use the menu and access the commands.

Microsoft Office: Ribbon Tabs Only

In most cases, however, I tend to PIN the ribbon using the little push pin that appears underneath my name, or, using this newly discovered feature, choosing the Show Tabs and Commands.

Microsoft Office: Ribbon Expanded

If you’re looking for this feature, it shows up in OneNote, Word, Excel, PowerPoint, and Outlook.

Using OneNote to track and manage your timesheet adjustments

OneNote can be used for a lot of different purposes, including managing timesheet adjustments. For those who are wage employees, if you’ve ever had to email your supervisor to request a timesheet adjustment, there tends to be a delay between your email and their updates to the timeclock system.

In the meantime, you may want to keep track of what your actual hours are so you can budget the remainder of the week according to your agreement. You may also want to keep track of the requests that you have sent, and then review that the requested changes were made on your behalf.

I created a sample spreadsheet, which you can download and then save to your OneDrive, or you can insert it directly into your OneNote document for future reference.

To keep track of your emails, you can create a category for time sheet adjustments and then go into your sent box and mark those emails with the time sheet adjustment category, which you can then use to filter your emails.

Or, you can click on the email and use the Send to OneNote button which will place your request into OneNote and will keep it in one place for you to review your timesheet requests against your timesheet system to ensure your supervisor made the changes as requested.

Either way, keeping track of timesheets is the bane of any hourly worker’s existence and when you’re not able to make adjustments yourself, then you have to create your own tracking system, whether it’s printing them out or using one of these electronic means. I hope this made your life a little bit easier.

Creating Outlook tasks from OneNote

OneNote is great at making notes, whether it’s your own personal to-do list, or a collective task list generated at a meeting. The to-do items can be turned into Outlook tasks by using the Outlook Tasks feature.

All you need to do is click into a pertinent paragraph or to do item, and then click the Outlook Tasks button, which opens a drop-down of your Outlook Task options:

  • Today
  • Tomorrow
  • This Week
  • Next Week
  • No Date
  • Custom…

Then once you have created this Outlook Task, you’ll now be able to review your task list in Outlook.

When you open the task in Outlook, you now also get a link back to the OneNote page and when you double-click on that icon, it will open the OneNote file to the page that includes the task.

*This tip works in the desktop version of OneNote.

Using the SEARCH TOOL ribbon in Outlook

You know, there’s nothing more fun than the obvious hitting you over the head. Many of you may read this post and think, gosh Vianne, I use this all the time! Why haven’t you seen this before?

And yet here I am, confessing that I have apparently ignored something that’s been right in my face the entire time: the SEARCH TOOLS ribbon.

When searching something in Outlook, I always use the quick search bar that appears above my email listing. I knew that I can just type something and it will find all the emails related to that topic. Over time I also learned that I can type “From: ” followed by the person’s last name, to get all the emails that person sent me.

What I didn’t know is that Outlook helps us out by showing us the SEARCH TOOLS ribbon every time we search.

It allows us to create a search on multiple features, so I can search all emails from someone with attachments for example, or all flagged emails about a particular subject. I figured there would be a syntax (i.e. a way of typing the commands) but never really put the time into learning how. And now I learned I don’t have to.

If this is not new to you, please share your favorite search combinations. If it is new to you, welcome to the club. This will soon be my favorite new feature.