Effects of changing Office365 login – part 6: reconnecting your OneNote files

A rather huge (though known) consequence of the login change was the effect it had on OneNote. With regular OneNote files, it was possible to reconnect the file fairly easily following the steps below. For staff and class notebooks it was another matter and we ended up needing to recreate those from scratch.

OneNote files located in SharePoint

Those who are using OneNote to access files located on SharePoint should only need to log out of Office and then log back in.

  • FILE tab
    • Account
    • Sign Out
    • Acknowledge all the warnings, and shut down all of your Office programs
  • Open OneNote again
    • FILE tab
    • Account page
    • Click Sign In
    • Log in with your “pid@starfleet.com”
    • The next screen will allow you to enter your password
    • Making sure the checkbox “keep me signed in” is on so you only have to log in one time
    • It should automatically connect all your services again
    • Go to the Home tab
    • Check all your notebooks

OneNote files in OneDrive

For those who have OneNote files that live on your OneDrive, follow the steps below.
To reconnect your file from within OneNote:

Alternatively, you can close your OneDrive OneNote file, then go to your OneDrive online, open it in a browser, and then click Edit in OneNote. If you have more than one, do these steps one book at a time so you don’t forget which books you’re supposed to have connected to your OneNote.

For OneNote files that live in someone else’s OneDrive, you would follow the same procedure as above, or you might be best to close the OneNote file, then go to your OneDrive online, click Shared with Me, and locate the folder or the file, then click Edit in OneNote.

Effects of changing Office365 login – part 5: Contact Detail Web Parts

This is a series of posts of what you can expect if you change the login for Office 365 in your company after roll out.

Today’s post is about an unexpected consequence that, just like the Delve one, is pretty reasonable once you think about it, and affects the contact detail web parts on all of your SharePoint sites.

The contact detail web part shows a picture (if available) of a user, and has link to their Delve profile. It’s a built-in function of SharePoint. Those profiles were all linked to @w2k.vt.edu profiles which of course no longer exist.

So, you’ll need to connect with your site owners to update all their contact detail web parts if they are using them on their sites. If you have any subsites that have contact pickers, they will need to be reviewed and updated as well.

Updating a contact detail web part:

From the EDIT button in the top right hand corner of your page:

  • Choose “Click here to add or modify a contact”
  • On the Contact Details Tool Pane, click on the little address book below the contact field.
  • Type the person’s last name in the Find field and hit Enter.
  • Pick the correct person and choose OK.
  • Click OK on the Contact Details Tool Pane.
  • Save the page.

contactdetail_page

contactdetail_webpart

contactdetail_picker

I need more than one contact on my page

Each contact detail box only allows one person, if you have page that needs to list two contacts and only one is listed initially, you will need to add a second contact detail box.

The way to add the second box is to first click where you want that second box to appear.

Then go to INSERT, then WEBPART.

webpart_add

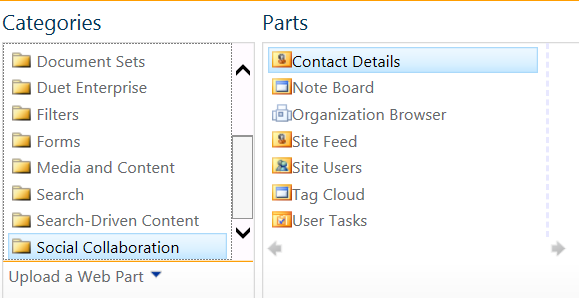
Under Social & Collaboration there’s a Contact Details web part that you add to the page.

contactdetail_add

When you edit the contact, there are two things you need to do.

  1. Add the person to it
  2. Under APPEARANCE, change Chrome Type to None. That will hide the header of the web part. You’ll still see the header while you’re in edit mode, but it will go away when you save the page.

contactdetail_chrome

Effects of changing Office365 login – part 4: Delve

One unexpected, though perfectly reasonable, consequence, is that the links to the five people on the left hand side of your main Delve are now broken. That’s because the links points to an address that include w2k_vt_edu. Thankfully in this case, Delve only shows 5 people’s names on the left hand side, and so the remedy is fairly short and simple.

Search for the person’s name, last name first. Their name will likely show up twice. If the individual had an image uploaded to their Delve, click on the name with the image as that is the correct one. If the individual did not have an image uploaded the profile names will look the same, and thus it will be trial and error until you find the correct one.

Another alternative to get your five people back, is to visit your community site if you have one and click on Members. If they are listed there, clicking on their name or picture will bring up their Delve profile, and voilà, you’re connected again.

If you don’t see your coworker in the Members page, encourage them to visit the community site and participate in at least one of the discussions or challenges on the discussion list, or click the Join link on the Members page.

Effects of changing Office365 login – part 3: broken links in shared file emails

To simplify our login process for Office 365 and SharePoint, our central IT folks ran a script that changed our login IDs from [pid]@w2k.vt.edu to [pid]@vt.edu. While the login transition appeared to have gone smoothly, we did have some expected and unexpected consequences. One of the expected consequences was broken links in emails about shared files.

It’s the emails that look similar to the one below:

OneDrive: Shared Email Sample

When you click on the link, you will get a strange little message that looks something like this:

HTTP/1.1 200 OK
Server: Microsoft-IIS/8.5
Date: Wed, 02 Mar 2017 13:50:33 GMT
Connection: close

To get to the file, remove w2k_ from the link address bar, to where the address link now reads pid_vt_edu. If I then go to Edit Workbook and Open in Word or Excel, I can link that file to my “recent” files in my Word or Excel.

Of course this w2k thing was specific to our company. Just bear in mind that if your company ever decides to change your login names, you’ll have your own version of this – it won’t be w2k and you’ll just need to customize these notes to your own changing scenario.

If your team does a lot of sharing, that process may be a little laborious. How else can we find our files?

Many of the them, you’ll be able to find in your Shared With Me link from your OneDrive, but not all – only the files that the original person shared with you.

I had a case where Person 1 had shared a file with Person 2, who then shared the file with me. Those files are not showing in my “Shared with me” link in my OneDrive.

OneDrive: Shared With Me

I only found them by finding Person 1 in Delve, clicking on their OneDrive link, and then clicking on Our files.

Delve: Our Files

Effects of changing Office365 login – part 2: Skype

The first indications of change: Skype for Business

My first indication of change was that I got logged out of Skype for Business. When I logged back into Skype for Business with my @vt.edu I decided it also might be best to just sign out of Microsoft Office completely, reboot my computer and then log in without the w2k.

Now that you have your new login for Office 365 you will need to change that for Skype for Business.

When you get to your login screen, you may need to click on the gear and choose FILE => Change Sign-In Address

Skype for Business: Change Sign-in

From there you’ll be taken to a screen that will allow you to change your sign-in address. From there, you can log in and get yourself connected to Skype for Business.

Skype for Business: Sign-in Address

Effects of changing Office365 login – part 1

Back in March I wrote a post about “how not to roll out SharePoint” and I said I would share some of the ramifications of changing the login procedures.

When our central IT folks initially set up SharePoint for us, they added the characters w2k between the @ sign and the email extension. So, in Star Trek language: jtkirk@starfleet.com became jtkirk@w2k.starfleet.com.

Then, at some point, they removed the w2k requirement, and had it go back to jtkirk@starfleet.com. So, what are the ramifications of this change? Quite a few, and I figured I would spend a little bit of time this month going through some of the changes we experienced, just so you are educated on why NOT to do things this way.

Un-training everyone

After training everyone all this time to insert the w2k as part of the login process, it’s almost sad that we get to un-train this annoying little addition, right? Euh, NO. I for one am glad that we removed that little barrier to adopting SharePoint, and that we no longer have to be conscious of our behavior every time we log in.

Featured on Twitter!

Yesterday was a cool day! I woke up to find that I had been “mentioned” on Twitter with one of my blog posts: Organize your OneNote: Using Pages and Sub Pages. Thank you so much to OneNote Central for posting my blog on your Twitter feed.

I have only recently been tweeting my blog posts on Twitter, and so it’s nice to know that those efforts are paying off. I got close to 100 visits just from that one post, so that’s pretty neat.

OneNote: extract words from pictures!

One wonderfully handy tool in OneNote is the ability to extract words from a picture.
Take this image for example, a random motivational quote I found on Google.

One Note: Picture of a quote that says "Your mind is a powerful thing. When you fill it with positive thoughts, your life will start to change.

Quote: YOUR MIND IS A POWERFUL THING. WHEN YOU FILL IT. POSITIVE! THOUGHTS, YOUR LIFE WILL START TO CHANGE.

To pull the words from this image, right-click on the image and choose Copy Text from Picture from the drop down. Then click somewhere in your file, and paste.

OneNote: Copy Text from Picture

Here is what it gave me:
YOUR MIND
IS A POWERFUL
THING. WHEN
YOU FILLIT.
POSITIVE!
TÅOÜGHTS,
YOUR LIFE WILL
START
TO CHANGE.

So, while the result is not perfect, it can save you lots of time in typing the content.
Images with a solid background work better for this feature.

Try this feature and let me know how it works for you by entering a comment. Where do you find the best success? In what cases does it fail? What’s the funniest result you’ve seen?

Password Protecting a Section in OneNote

We have a special treat coming up as we have several presenters around the division sharing with us how they use OneNote in their daily work lives.

In preparation for the presentation, I had asked each presenter to share their OneNote file with me so that I could have them all available on my laptop as we presented today. I knew the enormity of what I was asking, as they were sharing their notebooks with me, some parts of which were very much confidential. The fact that my colleagues were willing to trust me with their very private documents was very humbling, and also a little scary, both for them and for me.

I was afraid I would accidentally reveal one of their private pages to the audience and that would not be good at all. Thankfully, OneNote has a way to protect sections of a document from prying eyes, and it’s actually very easy to do.

How to password protect a section in your OneNote

Simply right-click on the name of the section, and choose Password Protect This Section.

OneNote: Password Protect this Section

A panel will appear on the right hand side.

Click the Set Password button to set the password.

OneNote: Set Password

Please be aware that if you forget your password, there is no way for anyone to retrieve the information from this section, so be sure you use a familiar password.

OneNote: Password Protection Screen

Setting the password doesn’t actually lock that section from being seen. You then also need to click the Lock All button for those sections to be locked. They are locked from you as well as any other user.

OneNote: Password Protection Panel

You will need to hit Enter, or click on the text in the locked section in order to display the password screen to show the section.

OneNote: Password Protected Section

You can keep the password on the section for as long as you want, or you can use the Remove Password button to remove it. You will again be asked to enter the password, and then you will have unlocked your section completely.

Tips

  • You might not be able to view password protected sections on all devices.
  • Audio and Video recordings aren’t protected in the OneNote 2007 section format.
  • To search password protected sections, you need to unlock them first.