Installing QuickTime for Windows 10

As of this writing, Apple hasn’t come out with a new version of QuickTime that will run on Windows 10. In fact, any version after 7.7.6 won’t run on Windows 10. I first downloaded the latest version of QuickTime, hoping they had resolved the issue. They hadn’t.

Luckily, they still had version 7.7.6 available for download. I downloaded it, set the compatibility settings in the file’s properties, and now I have a working version of QuickTime on my Windows 10 machine.

I know the two companies don’t like each other, but can they stop taking it out on the user? Let’s just make sure your programs work in their environment so that businesses and people like ourselves can keep providing our services the way we’re used to. Thanks Apple and Microsoft!

Creating my own SP color scheme

You may wonder why such an advanced post about creating your own color scheme is so early in the game, but it just happened to be part of a project I am working on. We are in the process of creating public versions of sites for the division so that links from the home page actually go somewhere. Our college has its own color scheme of course, and so we wanted to get away from the standard blue scheme. I am not at the stage yet where we will be creating actual custom looks for the site, but the additional color scheme is at least a good start.

The easiest way to accomplish the creation of a color scheme file is to download the SharePoint Palette Tool from Microsoft. When you open the file, it starts off blue. Put in the color that you want to base your scheme from (in our case #660000), and then hit recolor.

From there, you can customize some of the “sub colors” within each block, and I spent a bit of time on the last block of colors, changing all the accent colors individually. Also, we like to have a splash of #FF6600 on our site, so I made the background of the item selection orange, as well as the selector button.

To save, just go to File, Save. It’s a little odd, since we normally have a Save As… function, but File, Save, is really a Save As, and you can choose where to save the file, and then name it whatever you want.

Deploying the Color Scheme

You deploy the color scheme at the site collection level. I have yet to find where to load it at the site level, so if you know, please reply in the comments below.
It lives at /sites/****/_catalogs/themes/15 with **** being your site collection level site name and you can just drag your newly named file directly to that location.

Then, for each site to which you want to deploy this scheme, go to Site Settings, then under Web Site Galleries choose composed looks. From there, choose “new item” – don’t try to do a quick edit, because a required field is missing from the list view.

For this initial deployment, I just copied the basic settings from an existing item profile, just changing out the name of the color scheme, and set the “order” to 5, so it would show up at the top of the list. It took a couple of tries, but I am glad to report, that it was pretty easy going overall.

There are plenty of tutorials out there by Microsoft and other SP users, who do a much better job of laying the steps out with accompanying images, that I suggest you search for a step by step tutorial on this if my instructions were somewhat vague.

Setting up my “Control Panel” in Outlook

In a previous post, I mentioned that I generally follow the advice of Sally McGhee and John Wittry in “Take Back Your Life: Using Microsoft Outlook 2007 to get organized and stay organized” when setting up my Outlook. They have a slightly different twist on David Allen’s “Getting Things Done”, which is a method of task and time management that I have followed for close to a decade now. You will see me refer to GTD more than once in coming posts, I am sure.

A great resource for setting up your Control Panel is “Office 2013 All-In-One Absolute Beginners Guide.” It contains step-by-step instructions for setting up things as I am about to describe.

Set up your To-Do Bar

From the View tab, click on To-Do Bar and turn on the Calendar to-do bar, then turn on the Tasks to-do bar. I personally don’t like seeing the agenda – I just like seeing the calendar in the top, so I slide the tasks section up to where it just shows the calendar and hides the agenda. I don’t use the contacts bar.

The tasks to do bar is really my bread and butter. It shows all the emails I have flagged, and any tasks I have set for myself. It does not include the tasks I keep in SharePoint, but that’s for a different post.

Folder Pane

I also customize the Folder Pane and choose Options, a maximum of 4 visible items and choose Compact Navigation. I don’t like wasted real estate on my screen if I can help it, and so I now have four icons at the bottom of my window. Not that it really matters, but I have Mail, Calendar, Contacts, and Tasks listed as my top 4.

Follow Up Default

The next step is setting my default follow up to be next week. Click on the follow up button and choose Set Quick Click. Choose your default option.

Views for different purposes

I set my calendar to show a work view. You can manage your views or control panels by folder, or by type of work you’re doing. So, I saved one for my default view when I am in emails and applied that to all the folders. Then I created a different view for when I am in calendar mode.

Setting your start pages in Internet Explorer and other browsers

One thing I noticed is that each of my browsers acted differently when I opened them, and even when I closed them.

I am a bit of a browser nerd and I tend to have 3 different ones running no matter which computer I am using. I use each for a different purpose.

On the Mac, I use Safari purely for Rhythm Percussion Ensemble, which is the Content Management System (CMS) we currently use to manage DSA department websites. I use Chrome to show my email and calendar, a nifty little tool I use to calculate how much time I spend on a project. I also use Chrome to listen to Pandora (ahem). Firefox is my work horse on the Mac. This is where I view my projects, create newsletters, and review website changes. I lose track of how many tabs I have open in Firefox. I also use Firefox to do my research.

On the PC, I spend most of my time in Internet Explorer because SharePoint Online and Internet Explorer are best friends. I have lots of tabs open as I work between all of the sites I am working on. I use Chrome for my research and anything not on SharePoint. Chrome is also my default browser. Also, I use its developer tools to identify the CSS code behind SharePoint pages if I need to, as the developer tools for Internet Explorer leave a lot to be desired. I use Firefox for posting images on our digital signage system, and other specific-task related work that’s outside of my role in SharePoint. I set all the different tabs to open on startup, so I never have to navigate to them manually. Normally, Firefox is my workhorse on the Mac, but because I need Internet Explorer for everything SharePoint related, I don’t use it much here, except for the digital sign work and to test things in different browsers.

Setting up your startup tabs in your browser

I warned you that I can be long-winded, but there are times that I like to provide context behind the topic at hand.

Each browser is different in how it sets up the start tabs for you, but most are similar enough to where these instructions for Internet Explorer should be general enough to work for you:

Find the gear, then choose Options or Internet Options
Under Home Page, type in the address(es) that you want to open first.

Internet Explorer Startup Screen

Within Internet Explorer, I also added my most frequently visited SharePoint Online sites including the central communication hub, my blog site, an Office365/SharePoint training site, and an administrative SharePoint site I built to keep track of issues.

What’s interesting about that, is that the SharePoint sites all require me to log in, but rather than log in three times, I just log in once, then click the little Home button on the browser, and all five pages reload. Nice extra bonus tip.

Having these sites set up in my home page tabs easily saves me about 10 minutes per load, or possibly up to 30 minutes a day. Try it!

Feedback from last week’s training sessions

One thing that’s always good to do whenever you offer training is to ask for feedback. You can plan all you want at the white board, but at some point, your customers are going to have to have some input into what you’re doing. If we don’t know what we did well, we won’t know what to repeat. If we don’t know what didn’t work, then we don’t know that we need to improve it. Makes sense, right?

As a Distinguished Toastmaster, I have given more than 50-odd speeches and continue to lead sessions and discussions in my daily capacity. I am used to evaluations and people telling me what I can improve, because if I don’t know what to improve, I don’t grow.

I used the same feedback form for both the LEAP into SharePoint presentations and SPOCK meeting, with some basic questions.

The first eight questions have the answer options of Strongly Agree, Agree, Neutral, Disagree, and Strongly Disagree.

  1. The facilitator clearly and effectively communicated the material.
  2. The facilitator presented the material in an interesting and engaging manner.
  3. The facilitator established good rapport with the attendees.
  4. The supporting materials (handouts, visual aids, etc.) were helpful to my learning experience.
  5. The activities (exercises, discussions, etc.) in this workshop were helpful to my learning experience.
  6. The material in this workshop is relevant to my job position.
  7. I will be able to apply knowledge and skills I have gained from participating in this workshop to my job.
  8. The amount of information presented was appropriate for the time allotted in this workshop.

The next four questions are open ended.

  1. What was the least effective part of this workshop?
  2. What part of this workshop do you think will have the most impact on your job performance?
  3. Would you recommend this workshop to others? Circle Yes or No. Why or why not?
  4. Please share any additional comments regarding your experience participating in this workshop.

I also asked them to indicate which session they attended, since I had multiple sessions. This question wasn’t that useful but it helped gauge if there was a change between sessions.


Results!

For LEAP into SharePoint day, the response was that the info itself was informational and helpful but that they would have liked it to have been more hands-on, with them actually using the software. OR, alternatively, show them the actual site. This makes sense, since it’s an online system.

I had created a slide show on PowerPoint. I could have done a live show, but you know how technology is when you’re under pressure. Somehow those bits and bytes know when you’re under the gun, and THAT happens to be the time that your wireless crashes for everyone.

To be fair, had we made this an interactive, hands-on session, it would have been an all-day affair because we crammed so much information into this 90 minute session. We’re now looking at creating hands-on versions with less content which will fit into a 90 minute session.


The responses to the SPOCK meeting were overwhelmingly positive because it was designed to be hands-on. The largest complaint appeared to be that there wasn’t enough time to complete the task. Considering that there were 60-90 slides, that wasn’t entirely surprising, although most of the participants managed to complete their task in plenty of time.

For some, the complaint was that we had two simultaneous tutorials, but most didn’t care because they were working from their own PowerPoint anyway, at their own speed. All appreciated the step by step instructions. Just a note, if you are going to do it this way, you need step by step instructions, with screen shots at every step.


General comments

Having conducted many training events before, I know that it’s important to think about the amount of content you cram into a session. It’s also good to have some activities for people to do, but just bear in mind that they often take 2-3 times as long as if you did them yourself.

I timed myself for the dept and committee page setup. From start to finish, creating the site, modifying the settings, setting permissions, and then populating the data, it took about 30-45 minutes per site, with much of the delay just coming from waiting for SharePoint to finish “working on it”. For each of these sites, I had already created the sites, modified the settings, and set permissions, so all that was left to do was populating the data, which for me takes about 15 minutes per site, but that’s because I know where all the buttons and bells are, and I don’t need a PowerPoint to tell me what to do. Giving them 60 minutes for this task seemed reasonable, but at the same time I knew that for some people, we would be crunched for time, just due to the level of competence that exists in the organization with basic computer skills.

At the end of the day, it was more important for people to go through the motions of completing the tasks, than it was for the sites to be perfect. It took me about 3 hours to go through each of the sites and correct the minor issues. Where the layouts were completely wacky, I had some puzzles to solve and in one case, I just deleted the site and recreated it because I had no idea where the person had gone wrong, but we knew that it had happened during the training, and I just told the person to keep going, go through the motions, learn how to add apps, remove apps, edit apps, and that I would fix the layout issue later. Fixing layout issues usually means going into the HTML which is not exactly where I want our site owners to go at this stage of the game.

Using Doodle…

While this has very little to do with SharePoint, it does have a little to do with organization, and getting things done. Today I set up my doodle profile, and connected it with one of my calendars – one that I will only use for Doodle, and here’s why:

  1. While I could connect it to my work calendar, I have way too many open spots on my calendar that people could cannibalize when I want to keep them meeting-free
  2. I have a time divide calendar that I use for my supervisor – basically a macro view of in which area I am spending my time, but without the detail of tasks and appointments. While this is nice for her, I can’t use this for my Doodle, because it would show me busy all the time.

So, I created a new calendar where I just blocked off the times I am working for one department, as well as the days that I want to keep clear for deadline purposes. I will see how much of a chore it is to keep up, but I do like that I get an email notification, which I will be able to drag directly over to the calendar for a meeting; and any meetings it schedules for me are automatically no longer available for anyone else.

For more information about Doodle…. visit doodle.com

SPOCKs built 50 sites in 3 hours

As I was building the “public” sites, those that are accessible throughout the organization, I looked at all the data that needed to be populated and decided that my job was not to do this for the organization, but rather it was the individual department’s responsibility to populate their own site. I very much believe in teaching someone to fish, rather than doing the fishing for them.

I decided to host a workshop for the SPOCKs (SharePoint Online Coordinators in the Know) to have them populate their own sites with data I would provide. I had already created a spreadsheet with all their information, since it needed to be gathered anyway, and I used mail merge to create info sheets for them. I made them all a printed copy, and then I used this macro to split the merges up into separate files.

I also made PowerPoint tutorials for each of the two types of sites: department sites and committee sites. All told, it might have taken me just as much time to gather all these materials as it would have to just do the work, but the SPOCKs will never learn how to do it themselves if they don’t get practice, so I developed the tutorials for them to populate their sites, and then I facilitated the workshop and flitted around helping people as they were stuck. Overall, I thought it was pretty successful.

Committee sites were shorter in scope, and spent more time in permissions. Department sites were a little longer in scope and added app parts and web parts. Running two separate tutorials at the same time was certainly interesting, and not something I would necessarily recommend, but they fared well. They learned to change navigation, edit web parts, delete web parts, add web parts, connect files, work on permissions, and all for the good of their own site, which was the most important part.

Watching people do the work, seeing how well they took to it, and what temperament they had was the most important part of the training. Many quietly worked on their sites and didn’t need any help. Others raised their hands fairly often. One got very frustrated and overwhelmed, and one or two had zero confidence in their abilities and needed hand-holding every step of the way.

SharePoint requires a lot of patience and persistence. If you’re not willing to work around its quirks you will have a tough time, so those that got flustered and frustrated will either not be in a good position to be site owners, or they will need a lot of help to get through it. Keep that in mind as you roll out SharePoint to your organization. Not everyone is suited.

As part of our roll out plan, we’re looking at different ways that we can help our site owners, our SPOCKs get more acclimated to SharePoint, and I am considering holding open office hours in our conference room if people want to use the time to build something. In reviewing our survey for self assessment, most of the SPOCKs want one-on-one coaching. If I host these working sessions and have everyone bring their own devices, then I might get something accomplished. I think I will talk to IT about making some laptops available for that and see what we can do.

These are all things to think about as you roll out SharePoint in your organization. Some kind of training needs to be made available, and just sending them to Lynda.com is not going to cut it if you want sufficient knowledge base. Also keep in mind that our site owners are not technical people. They are mostly administrative and thus you need to make the materials accessible at the beginner level in many cases.

We asked our SPOCKs to grade themselves as Beginner, Intermediate, etc. and it’s actually amazing how many of them considered themselves Intermediate when they really hadn’t worked in SharePoint all that much. I would say most are actually beginners and they are over confident with what they know. However, you could argue that they have a comfort level with what they know so far, and that’s why they are calling themselves Intermediate. I know I have a lot to learn, and I am looking forward to bringing this cool tool to the masses here at Tech.

Creating Mail Merges

Tomorrow I am conducting SPOCK meetings at work for SharePoint Online Coordinators in the Know, or site owners in our organization. They will be populating their Intranet pages for the Division of Student Affairs. In order to that, there are quite a few portions of their sites that need to be updated, including

  • department head
  • lead site administrator
  • message from dept leadership
  • about the department
  • a map with their locations (the location finder app)
  • an organizational chart (linking visio files)
  • links to their discussions page on another site
  • link to their private team site

For the committees, the list wasn’t as long but they would be updating

  • the committee’s charge
  • the member roster
  • the co-chairs for the group
  • basic meeting information – when and where they meet, etc.
  • links to their discussion page on another site
  • link to their private team site

I also included instructions for the committees to add people to their member rosters since many of them hadn’t been added yet.

o365-excel
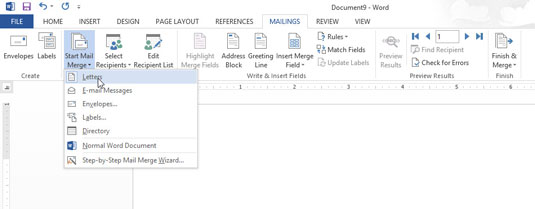
All of this information was gathered and captured in an Excel spreadsheet. I used a spreadsheet because I knew that I would need to mail merge that information later.

A lot of people think mail merges is only for letters or address labels, but it can be used for any kind of information sheet.

I had one Excel file with three or four sheets with different headers of information, and today I used the mail merge feature in Word to take the information from the various spreadsheets to make the different kinds of info sheets.

o365-wordThe combined file was great for print-outs, because I did want at least that info available in a printed form so people would know what they needed to copy. At the same time, I also wanted that info available to them in an electronic format, and I needed to split my letters up into separate files.

I know enough about the Internet that there are lots of smart people on there who have already figured out how to do this. Microsoft itself had posted one for splitting pages out. WordTips.net gave me one for splitting out sections, which is what I actually needed, since some of the info sheets actually spanned 2 pages.

This macro, which I modified to make it save docx files rather than doc files, does a fine job of splitting the data into separate files. The only place where it broke down was where I had turned some member lists into columns prior so I could print the info on one page. Word apparently takes columns as sections also, and it split the second column’s data into a separate file. Easy enough to recombine, but just something to be aware of before you use it. Using the split macro before changing the format of the page probably would have worked beautifully. Another thing to note is that the cursor needs to be at the beginning of the file in order for this macro to work correctly.

Once I split the files, they all had the name test followed by a number test1.docx, test2.docx etc. so I did have to rename them all, but all that is still less time than manually copying and pasting into separate files. Once I renamed the files I uploaded them to SharePoint, ready for tomorrow’s workshop.

I believe I now have all of my materials together. I have info sheets for each department and committee, in printed form, and in electronic form. I have instructions in two PowerPoint files – one for departments, one for committees. I have signup sheets, feedback forms, and resource pages with helpful tips and tricks, and also instructions to gather the info they need to complete the task.