
Setting variables inside Power Automate
Thank you for your patience as we went through the setup phase of this Power Automate process. In Part 1 we prepared the spreadsheet and connected it to the Power Automate flow. In Part 2 we created variables that we can now use to do some calculations.
In my example here, I created all the variables above the Excel List Rows function. I don’t think you necessarily have to do it in that order, but it just made sense for me to do it that way.
Because need to compare the information inside each individual row, we will need to use the Apply to Each action. From dynamic content, add the value field to the “select an output from previous steps” box. Adding value here is like adding the content from the entire row, which is what we want to do.
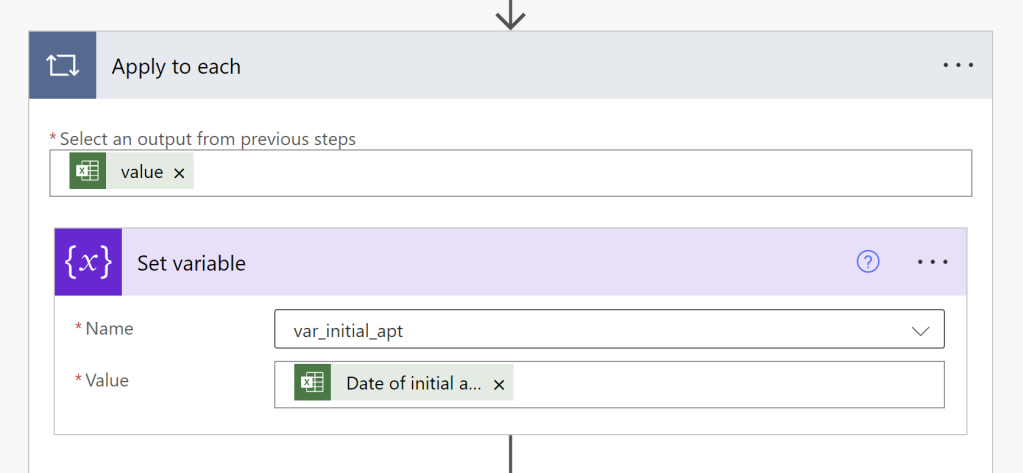
Next, we are going to pull the initial appointment date from the row. In order to do that, add the Set variable action, and from the dropdown, choose var_initial_apt. In the value field, drag the column in your spreadsheet that you want to manipulate. In our case, it was called “Date of Initial Appointment.”

Now that we have our initial appointment date, we’re going to add 90 days by adding another Set Variable action, this time choosing var_apt_plus_90 from the dropdown. We are going to use the “add days” formula (otherwise known as expression). In the value field, use the expression builder to enter the adddays(variables(‘var_initial_apt’),90).
The key pieces to this formula: adddays(the field you want to add dates to, the number of days). Because we are adding days to an existing variable, we need to tell it to look at variables, and inside single quotations, then give it the specific name of the variable we want to use. variables(‘var_initial_apt’)
The next field we set is var_apt_90_month_year. You can use the format date sample expression builder feature to provide you the following expression: formatDateTime(variables(‘var_apt_plus_90′),’MM-yyyy’)
Now that we have set all the variables, and performed some calculations on them, it’s time to put the whole thing together.
In Part 4, we will work on appending all the data into one string, and then sending a sample email with all the data. In Part 5, we will use the condition feature to compare today’s date against the 90-day field and filter our results we want.

2 thoughts on “Extracting data from Excel using Power Automate (Part 3)”