In the previous tutorial we covered the mechanics of creating the approval workflow on your calendar. Now we’re going build the user interface to where it’s more accessible for your users.
Create a Calendar view showing Approvals only
We want the calendar on SharePoint to only show approved leave, so we need to create a view that only shows approved leave.
You can edit the Calendar view if you wish and just add the filter piece to it; I prefer to create a new view based on the Calendar view, and then called it Approved, and set that as the default view.
Then scroll down to the filter area and set the Approval Status field is equal to Approved

Set the default view for Approval Tasks to be Active Tasks
You do not need to see old requests when you go to the Approval Tasks screen. You only want to see current items so you can approve or reject them.
Click on the Active Tasks link next to All Tasks, then once your active tasks load, go to the LIST tab and choose Modify View. Click the Set as Default checkbox and save.
Create pages that do not allow general users to see the back end of the SharePoint lists.
In general, within SharePoint you can click on a web part header to go to the back end of the SharePoint list. Because leave requests can be sensitive in nature, you don’t want the general population to be able to do that and gain access to submitted requests.
To combat this ability, create separate pages for each of the users, and then add the web part views to them, with Chrome Type = None. That way users can see the content of the page, but unless they are familiar enough with SharePoint, and have the necessary access, they won’t be able to see the back end.
You can get to the pages screen by going to the Site Contents and looking for SitePages. Else, you can click on the PAGE tab, and then View All Pages.
Calendar Page
You may want to add instructions to the calendar page on how to use it. In my blog post about how to break SharePoint I warn you about editing the actual calendar page. Therefore, create a new page, call it Calendar, and then add the calendar web part to it. Under Edit Web Part, choose the Approved view, and then under Appearance, set Chrome Type = None.
My Leave Requests
Create a new page, call it My Leave Requests, and then add the Task list web part to it. Under Edit Web Part, choose the My Leave Requests view, and under Appearance, set Chrome Type = None.
Side Note…
You could also create a page with both the Calendar and the My Leave Requests web parts on the same page.
Leave Approval – Pending Requests
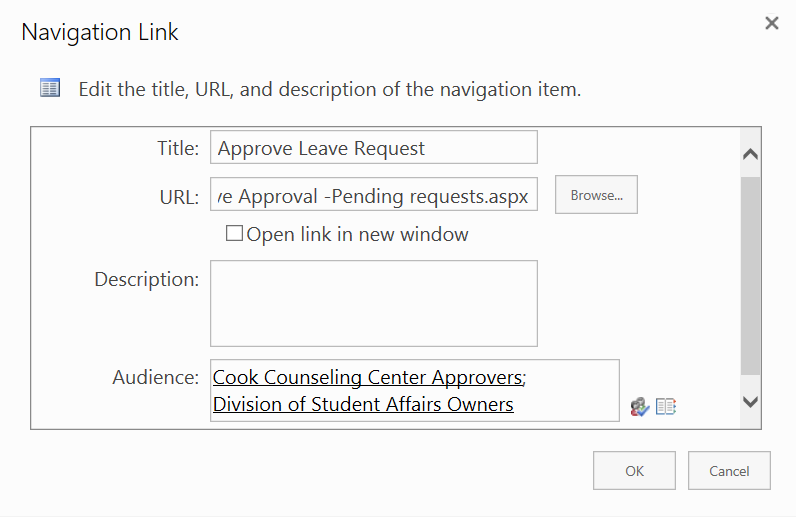
This page will be hidden in the navigation from everyone except the Approvers Group using the Target Audience setting in Navigation.
It contains the Tasks web part, with the Active Tasks view. I recommend you do not turn off the Chrome Type on this one so that if they needed to, the Approvers could click on Tasks and get to the back end if they needed, to possibly reverse a request response, etc.
Update the Workflow
To complete the process, we need to make a final change to the workflow itself to add a link to the Leave Approval – Pending Requests Page.
The email that is sent to the approver generates a link to the calendar item that was added. On the calendar item, there is an option to approve or reject the request. If the approver only uses that function, it does not close out the task on the task list. Therefore, we want to train the approver to go to the Leave Approval – Pending Requests page that contains the Active Tasks view.
Return to Workflow settings, and click on the name of the workflow (Leave Requests)
On the second screen, under the Request field, add the link to the Leave Approval – Pending Requests page such as shown below.
A request for leave is waiting for approval. To view details of request click on the link at the bottom of the page.
However, to actually <a href=”https://starfleet.sharepoint.com/sites/***/****/SitePages/Leave%20Approval%20-Pending%20requests.aspx”>approve request please use this link</a>.
Update Site Navigation
If you went through the steps of creating all the pages above, and thus hiding the built-in functionality of allowing users to get to the back end, then before you deploy the solution to your group, you will want to remove your apps from the navigation, and add your new pages to the navigation in their place.
Rather than going directly to Navigation and removing the links to the apps there, I suggest you go to the list settings for both the Calendar and Task apps, clicking on the Name & Navigation link and removing them from the Quick Launch. There can be an unintended consequence of having to manually add links in the future if you just remove them from Navigation.
Once you have set the apps to not show on Quick Launch, go to the Navigation menu by going to the Gear, then Site Settings, then Navigation.
In the Local Navigation, add the pages to the navigation. Use the Browse feature or just copy and paste the URLs from another browser window.
For the Leave Approval – Pending Requests page, use the Audience: field to restrict the link to that page. Click on the address book icon, search for your Approvers group, then add them to the audience. You also want to add the site collection administrators group, and if need be, your own site owners group.