
Append a variable, and send an email
We’re nearly there, thanks for sticking with it. In Part 1, we set up the spreadsheet and the initial Power Automate connection. In Part 2, we created the variables we needed. In Part 3, we set the variables and performed some calculations. Now that we’re in Part 4, we’re collecting all this information and putting it into an email.
To collect data from multiple rows to be included in one email, you need to use the Append a Variable action and then you place the Send an Email feature AFTER the Apply to Each action set.
NOTE: If you wanted to send a separate email for each row, you would use the Send an Email feature INSIDE the Apply to Each action set, and you likely would not use the Append a Variable action to gather the data, as you can place the content directly into the Send an Email action.
PRO TIP: In truth, you would probably do this part early on in the process, so that you can collect information from your variables and test your formulae along the way, but for blog purposes, I made this a separate topic.
You can mix data from the spreadsheet with data you created from the variables.
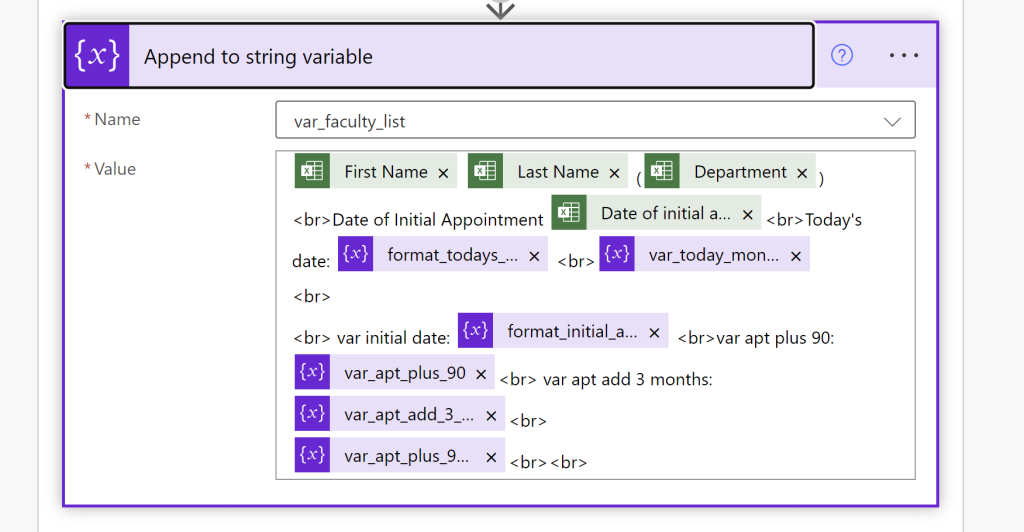
In Part 2, we created/initialized a variable called var_faculty_list as a string. In this part, we are going to use the Append a Variable action to add content from each row in Excel, as well as content derived through our calculations, into this one variable. The word append means “to add to.”
The append to variable action allows you to enter plain text, HTML, as well as content from your spreadsheet and any variables you created inside the flow. You add items to the append action by dragging them from dynamic content into the field.
Some formatting tips include
- Using spaces to separate the data (so that you get firstname lastname, and not firstnamelastname)
- Using parentheses around fields if they are informative
e.g. Corey Smith (Surgery) - Using <br> HTML code to create a new line between data
- Using <b> before, and </b> after data that you would like to bold
e.g. <b>Corey Smith</b> becomes Corey Smith - You can use any HTML code to build and format your var_faculty_list string

Now that you have gathered all the data, it’s time to send the email. Add the Send an Email action BELOW or AFTER the Apply to Each action set.
Enter the recipient’s email address, the subject line for the email, and inside the body, place the var_faculty_list variable.
When you test your flow, you should receive an email with all your data.
PRO TIP: If you test your flow and it fails, before you change any of the expressions, check the failure points to see if they failed at every step, or just after a certain number of records. If it’s the latter, your table may have some empty rows or data in it.
I would much prefer that Power Automate sends me an error saying “sorry, couldn’t process an empty field” than whatever esoteric message the computer provides such as “Column 0 list 0 unable to process Set a Variable”
When this happens, you may need to change the table size in your excel file to ensure you don’t have any empty rows below your data. You do that by clicking within the table, then under the TABLE DESIGN tab, choosing resize table. Check to make sure that your table size only includes rows with data.
In future steps, we can add a condition to the Power Automate flow so that it will not process steps if the data is blank, so that you can set your table size to allow for growth, but for testing purposes, let’s see if this helps.
PRO TIP: this is also why it is a good idea to add your data to either the append variable or the send an email from the very beginning, so you can check to see, is it passing the name of the person? Great. Is it passing today’s date? Great. Is it passing the initial appointment date? Great. Is it passing the plus 90 variable? Oh, now it fails. Is it failing for every record, or just some?
By testing your flow at the addition of each variable, you can better track what is going on with your flow as you go, because the reasons for failure are often esoteric and not helpful at all.

One thought on “Extracting data from Excel using Power Automate (Part 4)”