Save time using Format Painter

A feature that I use so often I almost take it for granted, is the Format Painter, which allows me to quickly copy formatting from one thing in a document to another.

The Format Painter tool appears under the HOME tab in most of the Microsoft Office programs. In Outlook it appears in the MESSAGE tab. It looks like a little paint brush.

Sometimes all you want to do is make the formatting of one thing match another. I have several practical applications for this. Most notably, any time you copy something from one program to another.

As much as Microsoft likes to think that formatting is the same across the board, it’s mistaken. Copying information from Word to OneNote or from OneNote to Outlook, I always end up having to update the formatting. Using Format Painter lets me do that very quickly.

To use the Format Painter tool, select a part of the document (the in case of Excel, the cells) that contain the formatting you want.

Click the Format Painter tool, and then select the part of the document (or cells) that need this formatting. VoilĂ !

BONUS TIP: If you double-click on the Format Painter icon, it will maintain the formatting copy function which allows you to paste the formatting to multiple locations within the document.

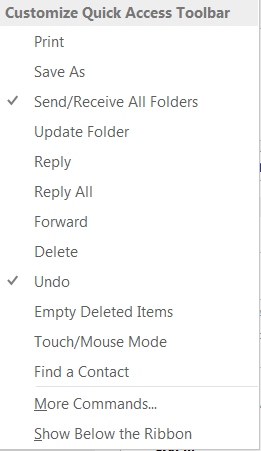
Quick Access Toolbar

In older versions of the Microsoft Office suite of products all the commands lived within menus, not in the ribbon as they do now. There was a section of the user interface where you could “dock” various often-used functions, such as font manipulation, open/close/print, etc.

When they went to the ribbon look, Microsoft thankfully didn’t forget us folks who had gotten used to these quick-click functions, and left the Quick Access Toolbar in-tact, which above the tabs.

Each application has slightly different default options, and also offers slightly different commands specific to the application.

WORD EXCEL
Quick Access Toolbar - Word Quick Access Toolbar - Excel
OUTLOOK ONENOTE
Quick Access Toolbar - Outlook Quick Access Toolbar - OneNote

If you haven’t played with the Quick Access Toolbar, you could miss out on placing some of your most commonly used featured in an accessible spot.

In Outlook, I added the Edit Message feature to the Quick Access Toolbar because I couldn’t find it in the ribbon. I also created new buttons to play my macros that create email templates and clean up my inbox, etc.

I tend to use this toolbar more when I am doing repetitive work. In my current position I have such variety that I haven’t had a need for adding features to the Quick Access Toolbar.

Ribbon Toggle Button – hide and show your ribbon easily

How many of you know about the Ribbon Toggle Button that appears in all of the Microsoft Office suite of products? The little button appears in the top right hand corner of Microsoft products, next to the minimize, maximize/restore, and X to close buttons. It’s a little up-arrow in a window. I don’t know if I ever noticed it was there, and even if I had, I might never have thought to click on it.

This little button lets you toggle the ribbon and choose between Auto-hide Ribbon, Show Tabs and Show Tabs and Commands.

Microsoft Office: Ribbon Toggle

Auto-hide hides pretty much everything including the main window controls, replacing them with the ellipses, which will temporarily show the ribbon and other window controls so you can minimize, maximizer/restore buttons so you can use them before the ribbon hides again. While a nice feature to reduce clutter, I doubt I will use the Auto-hide function very often.

Microsoft Office: Ribbon Collapse

The Show Tabs option returns the Quick Access Menu as well as the tabs (or menu bar). At the very least I like to have this view turned on, so I can use the menu and access the commands.

Microsoft Office: Ribbon Tabs Only

In most cases, however, I tend to PIN the ribbon using the little push pin that appears underneath my name, or, using this newly discovered feature, choosing the Show Tabs and Commands.

Microsoft Office: Ribbon Expanded

If you’re looking for this feature, it shows up in OneNote, Word, Excel, PowerPoint, and Outlook.

Comparing two documents in MS Word

Today I was sent two documents by two people in the same department. One was a revised version of the other. Neither file had tracked changes turned on, and so I had no way of knowing the differences without using the handy dandy Compare feature inside Microsoft Word.

As much as we like to complain sometimes about Microsoft and some of the thinking behind some features, sometimes you really have to take a moment to thank them for building all this neat functionality that makes our lives easier.

Comparing two documents

Under the Review Tab in Microsoft Word, click the Compare dropdown in the Compare section of the ribbon.

Then choose “Compare”


You then pick the original file, and the revised file. The only thing I wish it would let us do at this point of the process is pick from currently open documents instead of making us browse to the files, but that was just a minor inconvenience.

Clicking on the “more” button gives you more features to choose from as to what you actually want to compare. You may not care about white space or case changes, or perhaps you want to ignore headers and footers. By toggling these expanded features you’ll be able to customize the level of detail you get upon comparing.

This screen shows a blurred version of the results. The main portion shows the changes marked in blue, and then on the right hand side you see both the original (on top), and the revised copy (on bottom). Scrolling and moving the cursor in the main document also changes the view on the side panels, which is nice. Comparing also turns on the Revisions pane where you can see all the changes that were made by the individual.

Email merges

We’ve heard of using Mail Merge for sending out letters. Have you ever had the need to use Mail Merge with emails?

The process for creating mail merges for outlook is almost the same as for letters. You start with a word document and an excel spreadsheet with contact information.

Preparing the recipients list

Create a spreadsheet containing at minimum, these three columns:

  • First Name
  • Last Name
  • Email

Make sure the email column contains no special characters (other than the @ sign, the hyphen (-), the underscore (_) and the period (.) of course) and to make things easier for yourself, include a header show with these column labels, so you can find your fields more easily.

Prepare the email message

  • Start Microsoft Word and begin a new blank document.
  • Switch to the Mailings ribbon.
  • Click on the Start Mail Merge menu and select the E-Mail Messages option.
  • Click on the Select Recipients menu and select the Use Existing List option.
  • Browse and select the Excel spreadsheet you created earlier, and then click on the Open button.
  • In the Select Table window, click on the name of the sheet that contains your recipient’s information.
  • If you have options for Sheet1, Sheet2, and Sheet3, the information is probably on Sheet1.
  • If you entered column headings in the first row of your spreadsheet, make sure the First row of data contains column headers option is checked.
  • Click on the OK button.

Compose the body of your message using Word

You can switch back to the Home ribbon to add formatting including bold, italics, font colors, and headings.

Not all formatting will visible to all recipients. Outlook users will see most of the formatting. Web mail users will see bold, italics, and lists but not font styles or colors.

To customize the contents of your message with information from your spreadsheet

  • Position the cursor where you want to insert the data.
  • Switch to the Mailings ribbon.
  • Click on the Insert Merge Field menu and select the field containing the data you want to insert.
  • Save the body of the email message the same way you would save any other Word document.

Send the email messages

  • Switch to the Mailings ribbon.
  • Click on the Finish & Merge menu and select the Send E-Mail Messages option.
  • From the To drop-down menu, select the field containing the email address of each recipient.
  • In the Subject text box, enter the subject line used for the email message.
  • From the Mail format drop-down menu, select the HTML option.
  • For the Send records radio button, select the All option.
  • Click on the OK button to send the messages.

More Tips

If you customize the message for each recipient, use the Preview Results button on the Mailings ribbon to see the data from your spreadsheet in the body of the message instead of the field names. Use the arrows to right of this button on the ribbon to preview different records from your spreadsheet.

Customizing the email message for each recipient is easiest when the information is split into several columns. For example keeping the first name and last name in separate columns is better than keeping them in a single column called name. You can always put two fields together in your message, but pulling fields apart is much more difficult.

If you send newsletters or flyers as PDF attachments, consider publishing the PDF on your SharePoint site and then using email merge to send a notice with a link. Later you can check your site’s statistics to determine how many people downloaded the PDF.

This last tip goes for other types of documents as well. One great reason for sending a link to a cloud version of the site rather than an actual file is that if you discover an error in your file, you can fix it without needing to resend the document to everyone.

You may want to add yourself as the first recipient in your spreadsheet so you can test the message delivery. Use the Preview Results button to view the message you will receive. Follow the sending instructions, but change the Send Records option from All to Current. This will send only the message currently being previewed through Outlook.

Quick Parts in Outlook (and Word)

This tip about Quick Parts came from my colleague Annabelle Fuselier from VT Business Services:

Wouldn’t it be great to save time on typing the same e-mail over again? Well there is a feature in Outlook that will help you work smarter and not harder. It’s called Quick Parts and the feature is not only handy in Outlook it also works in MS Word. I have personally used this feature to request HokieMart/Banner approvals, sending screening matrices or meeting requests.

Creating a Quick Part in Outlook

  1. Create a new e-mail message
  2. In the body of the message type your text or select from a previous e-mail.
  3. Highlight the text you are using
  4. Click the insert tab
  5. In the “text” pane, select Quick Parts.
  6. Click on “Save Selection to Quick Part Gallery.”
  7. In the “Create New Building Block” screen:
    • Type in a descriptive name for the text or graphic in the Name field.
    • Type in a description of the Quick Part in the Description field.
    • Don’t change any other fields.
    • Click OK.
  8. When you want to insert the Quick Part into an e-mail message, click the Insert tab, select “Quick Parts” from the text pane.
    • scroll to the Quick Part you want to insert, and click it.

The process is the same in Word. However, Quick Parts are not shared between Word and Outlook, so you have to create separate ones for each application.

Microsoft Office: Hyperlink Window – continued

In the last post I showed you the basic settings in the Hyperlink Window and we looked at Existing File or Web Page. But if you look at the window below, there are other options, including Place in This Document, Create New Document, and Email Address. I thought we would look at those today.

Place in This Document

Place in This Document gives you some options of headings and bookmarks in Word and Outlook; Cell references and Sheet names in Excel; and Slide options in PowerPoint.

Microsoft Office: Hyperlink Window - place inside document

Create New Document

You can also create a brand new document from the Create New Document feature in this Hyperlink window, which I have never used.

Microsoft Office: Hyperlink Window - create new document

It looks like you can choose where your document will live, and whether you want to open the new document right away, or whether you want to just save it to edit later. Now that I see this feature, I might use it more often, especially since you can create files directly on SharePoint using this method, if you know the location where the file should live.

Microsoft Office: Hyperlink Window - create new document in SharePoint

Email Address

Adding an Email Address will generate this window, which allows you to enter in the Email address and the subject line for the email. This can help quite a bit when you want all the emails about a specific subject to be the same. It will generate a mailto:pid@vt.edu?subject=”subject line” type of link and when clicked, will open a new email in Outlook.

Microsoft Office: Hyperlink Window - Email

Microsoft Office: Hyperlink Window

Ctrl + K opens up the Hyperlink window in a number of Microsoft Office suite applications. Another way to get to the Hyperlink window, is to right-click your text, showing the menu. A third way is to use the INSERT ribbon and click on LINK.

Inserting a link activates the “Insert Hyperlink” window box, which looks a little different based on which program you’re in.

I don’t know if I have ever really examined this Insert Hyperlink window, because I usually know where I need to go, which is usually somewhere on the machine in which case I would use the folder window below to browse, or a web address which I would normally have copied from the internet and pasted in the Address bar.

Microsoft Office: Hyperlink Window

But, take a look at this window and all the options it offers: Existing File or Webpage, under which you have Current Folder, Browsed Pages, or Recent Files.

Current folder shows the above view.

Browsed pages looks as below:

Microsoft Office: Hyperlink - Browsed Pages

Recent Files looks as below:

Microsoft Office: Hyperlink - Recent Files

Beyond Existing File or Web Page there are three tabs in the Hyperlink window: Place in This Document, Create New Document, and Email Address, which we will look at more closely in the next post.

Removing all images in Word or Excel

Sometimes when copying information from a SharePoint page (or any website for that matter) to an Excel or Word document, you can end up with images that you don’t want. You could click each of the images and hit DELETE to get rid of them, but here is a faster way:

In Excel

Use the Go To command (Ctrl + G), then choose Special, then Objects.

The delete and backspace keys will remove the images from your worksheet.

In Word

Open the Find & Replace tool (on the PC, it’s Ctrl+H)

To remove all images at once, place ^g in the find field, leave the replace field blank, and then choose Replace All

MS Word shortcuts for increasing and decreasing font size

Using shortcut key combinations can often allow us to get our work done much more quickly. Key combinations don’t always follow one another between applications, and so this is sometimes where happy accidents come from. We love happy accidents.

Ctrl + }

increases your font size

Ctrl + {

decreases your font size

Some of you may be thinking “what, you didn’t know this one?” but this one was new to me. What is your favorite key combination and which application uses it? Please post it in the comments below.